Introduction
The holiday season brings a sense of joy and nostalgia, especially through the lens of festive treats. One delightful way to celebrate this joy is by recreating the beloved Little Debbie Christmas Tree Cakes in a new form: truffles. These bite-sized delights encapsulate the flavors and textures of the classic cakes, transforming them into a fun and shareable dessert.
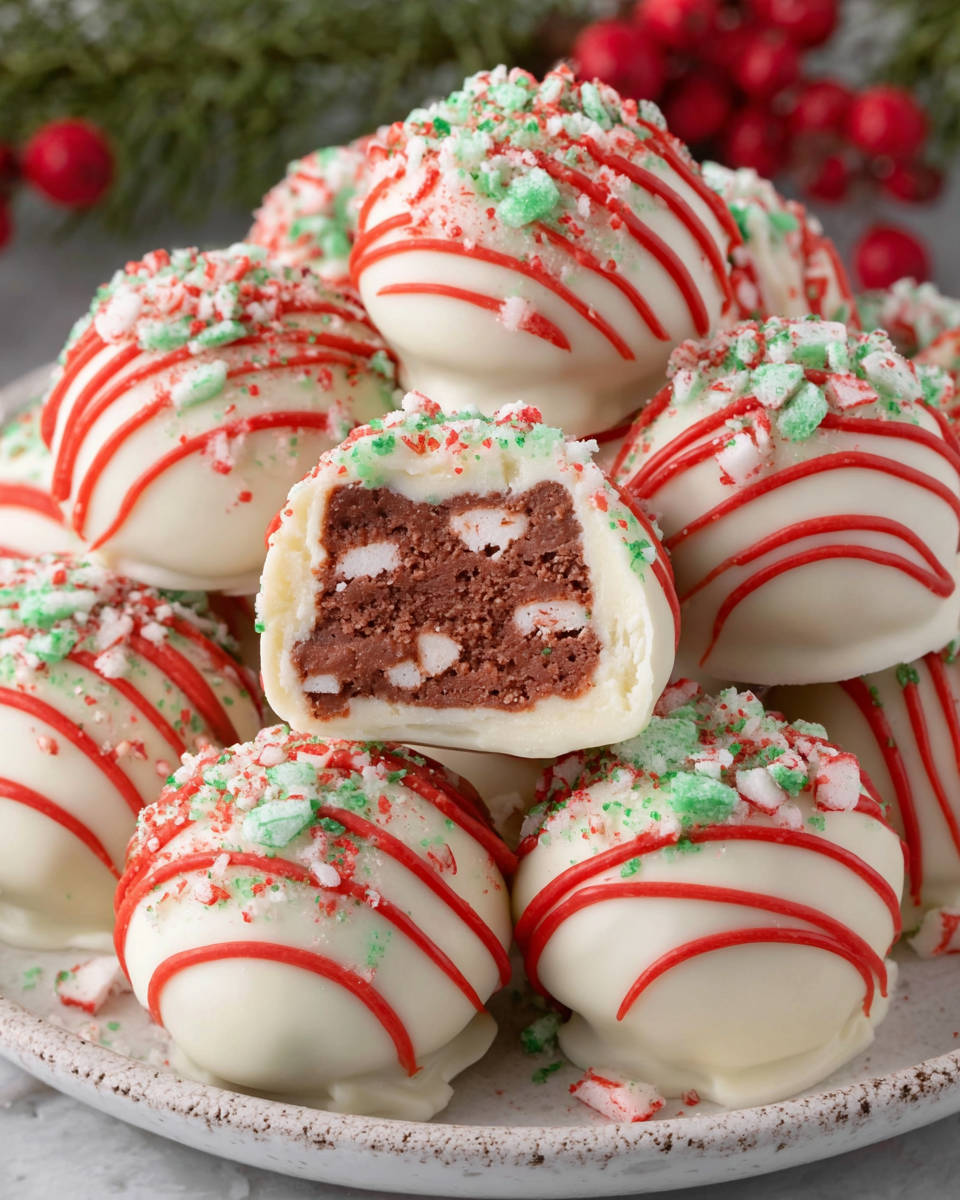
Imagine rich cake, creamy frosting, and a coating of chocolate, all neatly formed into indulgent little spheres. These truffles not only taste amazing but also make for a wonderful gift or dessert spread for holiday gatherings. Plus, they're remarkably simple to make, ensuring you can whip them up even on the busiest of days.
Ingredients
- 1 box of Little Debbie Christmas Tree Cakes
These iconic cakes provide the base flavor and texture for the truffles. They are soft, sweet, and infused with that nostalgic holiday taste. - 8 oz cream cheese
Cream cheese adds a rich, tangy flavor and helps bind the truffle mixture, making it creamy and easy to roll into spheres. - 1 cup chocolate chips (milk or dark)
The chocolate chips are melted to coat the truffles, adding a silky finish that complements the sweetness of the cake inside. - Sprinkles (optional)
Sprinkles offer a fun decorative touch, enhancing the festive appearance of the truffles while adding a little extra crunch. - 1 tsp vanilla extract
Vanilla extract enhances the overall flavor profile, adding depth to the sweetness and making the truffles taste even more indulgent.
Directions & Preparation
Step 1: Crumble the Little Debbie Christmas Tree Cakes into a bowl.
This first step is crucial as it transforms the cakes into a manageable mixture. Ensure you crumble them finely, as larger pieces may not combine well with the cream cheese. Use your hands or a fork for an even consistency that will blend seamlessly with the other ingredients.
Step 2: Add the cream cheese and vanilla extract to the cake crumbs.
Incorporating cream cheese not only adds richness but also binds the crumbs together, creating a cohesive truffle mixture. Mix thoroughly until no dry cake is visible, ensuring a smooth texture. This step is key for achieving the truffle's creamy interior.
Step 3: Chill the mixture in the refrigerator for at least 30 minutes.
Chilling helps firm up the mixture, making it easier to roll into balls. As the mixture cools, it will be less sticky and hold its shape better when forming the truffles. This wait time is essential for achieving perfect truffles that won’t fall apart.
Step 4: Scoop out small portions and roll them into balls.
Using a small cookie scoop or your hands, take a portion of the chilled mixture and roll it into a ball approximately 1 inch in diameter. This step allows you to shape the truffles consistently. Ensure not to make them too large, so they remain bite-sized and easy to pop in your mouth.
Step 5: Melt the chocolate chips in a microwave or double boiler.
Melting the chocolate properly is crucial for achieving a smooth coating that adheres well to the truffles. Be cautious not to overheat the chocolate; short bursts in the microwave or stirring over simmering water will help you achieve that glossy finish without lumps.
Step 6: Dip each truffle in the melted chocolate, then place on a parchment-lined tray.
This step involves fully coating the truffles, ensuring they are evenly covered. Use a fork for dipping, allowing excess chocolate to drip off before placing them on the tray. The parchment paper helps prevent sticking, making it effortless to remove truffles once the chocolate sets.
Step 7: Sprinkle with decorations while the chocolate is still wet.
Adding sprinkles while the chocolate is soft allows them to adhere without falling off later. This final touch not only enhances the festive look but can also provide an appealing texture contrast to the creamy chocolate exterior.
Step 8: Let the dipped truffles cool at room temperature or refrigerate to set.
Allowing the chocolate to set ensures the truffles are properly formed and ready for serving. You can refrigerate them to speed up the process, resulting in beautifully hardened chocolate that's ready to enjoy or gift.

Creating Texture with the Right Ingredients
The texture of your Little Debbie Christmas Tree Cake truffles is key to their success. By using well-blended cake crumbs, you ensure a consistent bite. The addition of cream cheese not only creates a creamy mouthfeel but also complements the sweetness of the cake, making each truffle decadently rich. Opting for high-quality chocolate can enhance the overall texture, providing a glossy finish that melts in your mouth.
Customization Options for a Personal Touch
Although these truffles are based on the iconic Christmas Tree Cakes, you can easily customize them. Consider adding different flavor extracts, such as peppermint or almond, for a unique twist. You can also incorporate crushed peppermint candies or nuts into the mixture for added flavor and crunch. This adaptability allows you to create a version that's tailored to your personal tastes or guest preferences.
The Art of Presentation
Presentation plays an important role in holiday treats, and these truffles are no exception. Arranging them on a festive platter or in decorative gift boxes can elevate the experience. Consider using metallic foil cups for individual servings, and layer them with colorful paper. A sprig of holly or a festive ribbon can add a special touch that makes these truffles perfect for gift-giving or as a centerpiece at your holiday gathering.
FAQs
What if my truffle mixture is too dry?
If the mixture feels too dry and crumbly, you can add a little more cream cheese to help bind it together. Start with a tablespoon at a time until the mixture holds together.
Can I substitute white chocolate for the coating?
Absolutely! White chocolate will provide a sweeter and creamier coating, which complements the truffle filling well. Just make sure to melt it gently.
What should I do if my melted chocolate is too thick?
If your chocolate is too thick for dipping, you can add a teaspoon of coconut oil or vegetable shortening to thin it out. Stir until smooth and then use it for coating.
How can I avoid my truffles melting in warm temperatures?
To prevent melting, store the truffles in a cool place and use quality chocolate with a higher cocoa content, which tends to hold up better under warm conditions.
What if I can't find Little Debbie Christmas Tree Cakes?
You can use any store-bought vanilla cake or similar snack cakes as a substitute, adjusting for flavorings to match the essence of the Christmas Tree Cake.
How can I make my truffles look more festive?
You can drizzle contrasting colored chocolate over the truffles or roll them in crushed candy canes for an extra holiday flair.
Conclusion
Creating Little Debbie Christmas Tree Cake truffles is an enjoyable way to bring sweetness and joy to your holiday celebrations. With their delightful blend of flavors and textures, these truffles are sure to be a hit among family and friends, making them a perfect treat for gifting or sharing.
Whether you opt to keep the recipe classic or add your personal twist, each bite is bound to evoke nostalgic holiday memories. So gather your ingredients, roll up your sleeves, and get ready to delight in a festive, delicious adventure in the kitchen.
Recipe Card

Butternut Squash Pasta with Sausage and Spinach for Fall
Ingredients
- 12 ounces of pasta
- 1 medium butternut squash peeled and cubed
- 1 pound of Italian sausage sweet or spicy
- 3 cups fresh spinach
- 1 onion diced
- 3 cloves of garlic minced
- 3 tablespoons olive oil
- 1 teaspoon dried thyme
- Salt and pepper to taste
- 1/2 cup grated Parmesan cheese
Instructions
- Cook the pasta according to package instructions until al dente.
- In a large skillet, heat olive oil over medium heat and sauté the onion until translucent.
- Add minced garlic and Italian sausage to the skillet, breaking it apart, and cook until browned.
- Stir in the butternut squash and thyme, cooking until the squash begins to soften.
- Add fresh spinach and a splash of reserved pasta water, then stir until the spinach wilts.
- Combine the cooked pasta with the sauce, tossing everything together thoroughly.
- Finish with grated Parmesan cheese and serve hot, garnished with extra herbs if desired.
Notes
Additional serving suggestions: pair with a crisp salad, garlic bread, or roasted seasonal vegetables for balance.
For make-ahead, prep components separately and assemble just before heating to preserve texture.
Taste and adjust with acid (lemon/vinegar) and salt right at the end to wake up flavors.


