Introduction
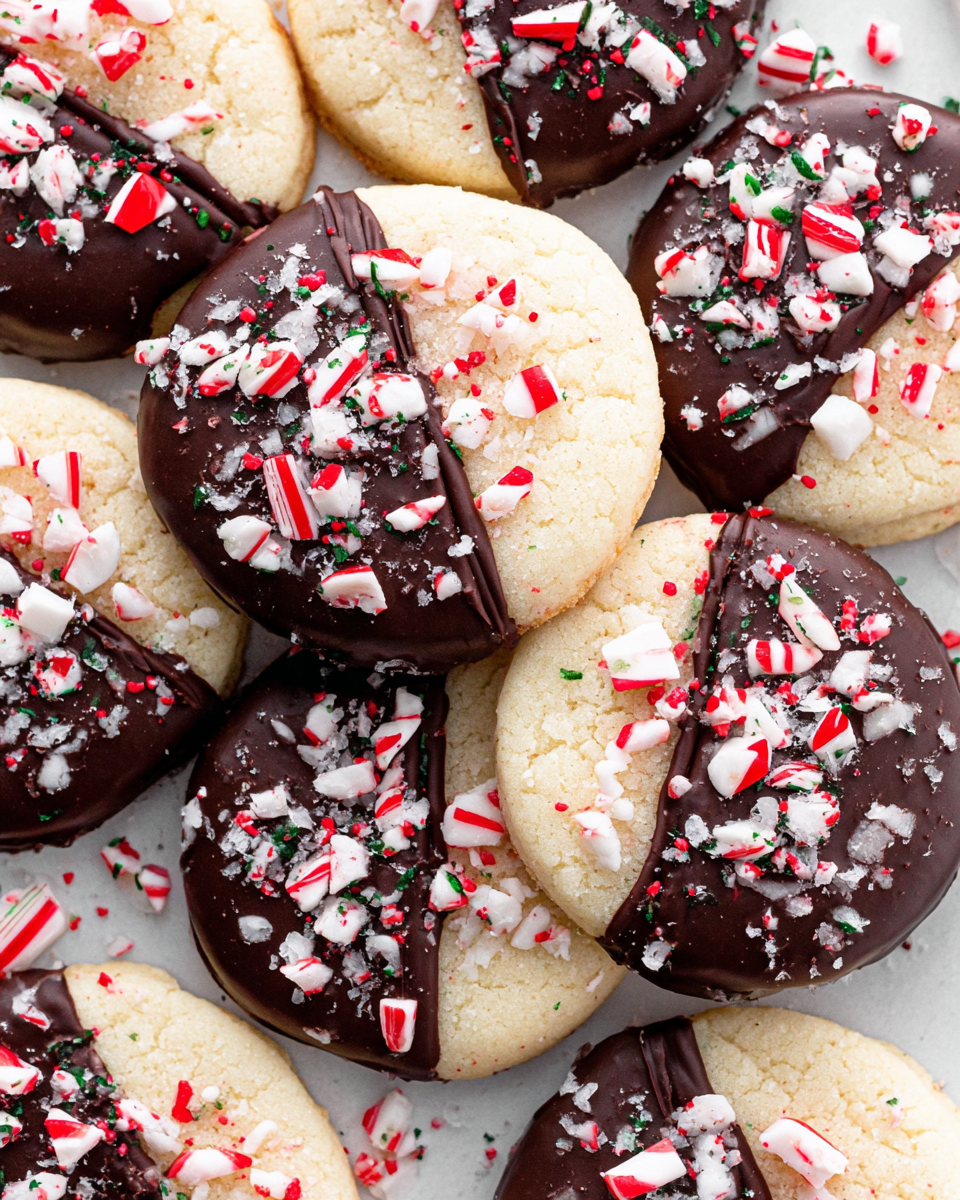
Chocolate Dipped Peppermint Sugar Cookies from In Bloom Bakery perfectly embody the festive spirit of the holiday season. These delightful treats combine the classic richness of sugar cookies with a refreshing twist of peppermint, creating a wonderful flavor balance that is sure to please. The finishing touch of chocolate not only adds decadence but also enhances the presentation, making them ideal for holiday gatherings or gifting.
Baking these cookies can be a joyous experience, whether you're an experienced home cook or trying out something new. The vibrant colors of crushed peppermint and glossy chocolate will bring excitement to your kitchen. Don't be surprised if you find yourself stealing a cookie (or two) before the batch cools!
Ingredients
- 2 3/4 cups all-purpose flour
This is the base of your cookie and provides structure. The gluten in the flour develops as you mix, supporting the soft, chewy texture of the final baked cookie. - 1 teaspoon baking soda
A leavening agent that will help cookies rise a bit, giving them a soft and fluffy texture. It also helps to create a slight spread during baking, ensuring a lovely, tender cookie. - 1/2 teaspoon baking powder
Works alongside baking soda to contribute to the cookies' rise while also maintaining a soft center. This balance is essential for achieving that melt-in-your-mouth quality. - 3/4 teaspoon salt
Salt enhances the flavors in baked goods. Without it, the cookies could taste flat. Here, it amplifies the sweetness and chocolatey flavors. - 1 cup unsalted butter, softened
Butter adds richness and flavor to the cookies. It also creates a tender texture and assists in the overall spreading of the dough during baking. - 1 1/2 cups granulated sugar
This not only sweetens the cookies but also aids in achieving a crunchy exterior while maintaining a soft center. - 1 large egg
Eggs provide moisture and structure to cookies, helping them rise and bind together. The fat from the yolk also adds flavor. - 1 teaspoon vanilla extract
Vanilla enhances the taste of the cookies, providing a warm, aromatic profile that complements the peppermint and chocolate. - 1 teaspoon peppermint extract
This gives your cookies their signature minty flavor. A little goes a long way in creating a refreshing taste that elevates the entire cookie. - 8 ounces semi-sweet chocolate, chopped
Melting chocolate creates the rich coating for the cookies, adding an indulgent layer of flavor. The chocolate's sweetness balances the peppermint's freshness. - 1/4 cup crushed peppermint candies
These add a vibrant crunch and visual appeal to the cookies as well as an additional burst of peppermint flavor, perfect for the holiday season.
Directions & Preparation
Step 1: Preheat your oven to 350°F (175°C).
Preheating the oven is a crucial first step to ensure that your cookies bake evenly. If you place the cookies in an unheated oven, they may spread too much and not hold their shape properly during baking.
Step 2: In a bowl, whisk together the flour, baking soda, baking powder, and salt. Set aside.
Whisking these dry ingredients together ensures that they are evenly distributed throughout the dough. This helps to avoid clumps and promotes consistent rising and flavor in each cookie.
Step 3: In a separate bowl, cream together the softened butter and granulated sugar until light and fluffy.
Creaming butter and sugar aerates the mixture, incorporating air for a lighter texture. This step is vital for achieving the signature soft and chewy texture of the cookies. Beat for about three minutes for the best results.
Step 4: Add the egg, vanilla extract, and peppermint extract to the butter mixture, beating well to combine.
Incorporating these wet ingredients enriches the dough and enhances its flavor profile. The egg acts as a binder, and the extracts provide that delightful minty sweetness that defines this recipe.
Step 5: Gradually add the dry mixture to the wet ingredients, mixing until just combined.
Overmixing can lead to tough cookies due to excess gluten formation. Mixing until just combined ensures a tender cookie that is soft and chewy.
Step 6: Chill the dough for at least 30 minutes to allow flavors to meld and the dough to firm up.
Chilling the dough is an essential step that prevents the cookies from spreading too much in the oven. It also enhances the flavors, allowing the peppermint to permeate throughout the cookie.
Step 7: Scoop tablespoon-sized portions of dough onto a baking sheet lined with parchment paper, spacing them about two inches apart.
Scooping with a spoon helps maintain uniform size for even baking. Spacing is key, as the cookies will spread during baking, so they shouldn't touch or become too close.
Step 8: Bake for 10-12 minutes, or until the edges are lightly golden, and the centers still look soft.
Keeping an eye on the baking time is crucial; overbaking can lead to dry cookies. The cookies will continue to firm up as they cool, resulting in a perfect chewy texture.
Step 9: Let the cookies cool on the baking sheet for 5 minutes before transferring them to a wire rack to cool completely.
Cooling on the baking sheet allows cookies to set slightly and makes them easier to transfer without breaking. Once on the rack, they can cool down evenly and stay crisp.
Step 10: Melt the chopped chocolate in a microwave or double boiler until smooth.
Melting the chocolate properly is essential for a glossy finish. Be careful not to overheat it, as chocolate can seize if cooked too long. Stir often to achieve a smooth consistency.
Step 11: Dip the cooled cookies halfway into the melted chocolate and place them on parchment paper to set.
Dipping the cookies allows for an even coating and adds a luxurious touch. Ensure that excess chocolate drips back into the bowl before placing them on paper to avoid puddles.
Step 12: Sprinkle crushed peppermint candies on top of the chocolate before it sets.
Adding the peppermint candies while the chocolate is still warm ensures they adhere properly. They add a delightful crunch and beautiful color contrast, accentuating the festive appeal.
Step 13: Allow the chocolate to set completely before serving or storing.
Patience pays off! Letting the chocolate fully harden is important for both presentation and flavor. This step allows for easy stacking and storage without smudging.

The Magic of Chilling Cookie Dough
Chilling cookie dough is often overlooked in many recipes, but it plays a vital role in producing the perfect sugar cookie. When dough is chilled, the butter firms up, preventing the cookies from spreading too thin while baking. Additionally, it allows the flavors, especially the peppermint, to develop more fully. This simple step can make the difference between chewy perfection and flat, crisp cookies.
Choosing the Right Chocolate
For chocolate-dipped cookies, the choice of chocolate can significantly impact the taste and texture. Semi-sweet chocolate balances well with the sweetness of the cookies and the refreshing peppermint. Dark chocolate can add a richer depth, while white chocolate provides a creamy contrast. Whichever you choose, ensure it melts smoothly for the best coating experience, contributing to the overall indulgence of the treat.
Peppermint: The Festive Flavor
The inclusion of peppermint extract is what sets these cookies apart during the holiday season. While the mint flavor is refreshing on its own, it also complements the sweetness of the sugar cookie and the richness of the chocolate. For those looking to amplify the peppermint experience, consider using crushed peppermint candies not just for decoration but also in the dough for an extra burst of flavor.
FAQs
What if my cookie dough is too sticky to handle?
If the dough is sticky, it may need a bit more flour. Gradually add up to 1/4 cup more, mixing until you reach a manageable consistency. Alternatively, chilling the dough longer may help.
Can I use different types of extracts other than peppermint?
Yes, you can substitute peppermint extract with other extracts like almond or vanilla, but keep in mind it will change the flavor profile of the cookies.
What should I do if my melted chocolate is too thick?
If your melted chocolate is too thick for dipping, try adding a small amount of vegetable oil or cocoa butter to thin it out. Stir until smooth and use for dipping.
How can I make my cookies more visually festive?
In addition to crushed peppermint on top, you can drizzle extra melted chocolate over the cookies or use colored sprinkles for added fun and color.
What if my cookies are overcooked and dry?
If your cookies have become dry, consider adjusting your oven timer next time, as ovens vary. You can also sandwich the cookies with some frosting or chocolate ganache to add moisture.
Can I scale this recipe for a larger batch easily?
Yes, this recipe can be doubled or halved without altering the proportions significantly, allowing you to bake just the right amount for your needs.
Conclusion
Baking Chocolate Dipped Peppermint Sugar Cookies is a delightful way to embrace the holiday season, offering a balance of warm flavors and refreshing minty notes. Each bite delivers a sweet nostalgia, perfect for sharing with friends and family.
With these cookies, you don’t just create a treat; you craft memories around baking and enjoying them together. So gather your ingredients, invite some loved ones over, and immerse yourself in the delicious art of cookie-making!
Recipe Card
A Flavorful Take on the Classic Shrimp Po’ Boy
Ingredients
- 1 pound large shrimp peeled and deveined
- 1 cup buttermilk
- 1 cup all-purpose flour
- 1 cup cornmeal
- 1 teaspoon cayenne pepper
- 1 teaspoon paprika
- Salt and pepper to taste
- 4 hoagie rolls or French baguettes
- Lettuce shredded
- Tomato sliced
- Remoulade sauce for serving
Instructions
- Prepare the shrimp marinade.
- Combine dry ingredients for the coating.
- Heat the oil for frying.
- Coat the shrimp.
- Fry the shrimp.
- Drain and season the fried shrimp.
- Assemble the po’ boy sandwich.
- Serve immediately.
Notes
Additional serving suggestions: pair with a crisp salad, garlic bread, or roasted seasonal vegetables for balance.
For make-ahead, prep components separately and assemble just before heating to preserve texture.
Taste and adjust with acid (lemon/vinegar) and salt right at the end to wake up flavors.


