Introduction
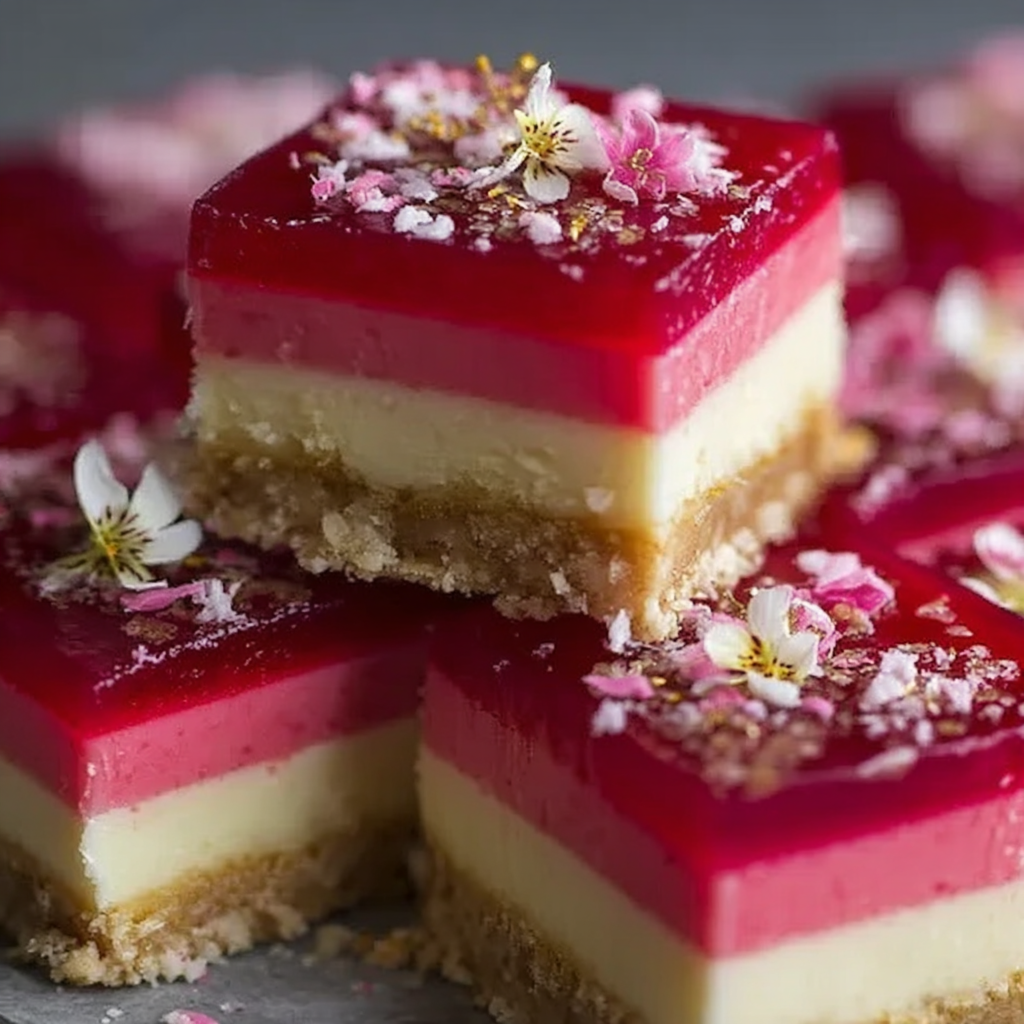
Cranberry curd bars are a delightful twist on traditional lemon bars, bringing a vibrant tartness to your dessert table. The bright and tangy flavor of cranberries creates a unique curd that is both refreshing and indulgent. Perfect for gatherings or an afternoon treat, these bars are sure to impress friends and family alike.
The process of preparing cranberry curd bars is straightforward, and the ingredients work harmoniously to create a luscious dessert that balances sweetness and acidity. With a buttery crust and a smooth cranberry filling, each bite is a burst of flavor that will leave you wanting more. Get ready to celebrate the season with these scrumptious treats!
Ingredients
- 1 cup all-purpose flour
The base of the crust, all-purpose flour provides structure and texture to the bars. It helps create a tender yet sturdy foundation that holds the curd filling. - 1/2 cup unsalted butter, softened
Butter adds richness and flavor to the crust, ensuring it has a melt-in-your-mouth quality. Softened butter is essential for even mixing and achieving a light, airy texture. - 1/4 cup granulated sugar
Sugar sweetens the crust, balancing the tartness of the cranberry curd. It also contributes to the browning and overall flavor of the crust. - 1/4 teaspoon salt
Salt enhances all the flavors in this dessert. It sharpens sweetness and offsets the tartness of the cranberries for a well-rounded taste. - 1 cup fresh or frozen cranberries, blended
Cranberries are the star ingredient, providing a beautiful color and distinct tart flavor. Blending them creates a smooth puree that forms the base for the curd. - 3/4 cup granulated sugar
This sugar sweetens the curd, balancing the natural tartness of the cranberries. It is essential for achieving the right flavor and consistency. - 3 large eggs
Eggs serve as a binding agent, helping the curd set while adding richness. They contribute to a creamy texture that complements the tart cranberries. - 1 tablespoon lemon juice
Lemon juice brightens the flavor of the curd and enhances the tartness of the cranberries. It also helps the curd set by adding acidity. - Zest of 1 lemon
Lemon zest adds a fresh, aromatic quality to the curd, enriching its flavor profile. It brings a subtle brightness that balances the tartness beautifully.
Directions & Preparation
Step 1: Preheat the oven to 350°F (175°C).
Preheating the oven ensures even baking of the crust. An adequately heated oven helps achieve a golden-brown exterior while ensuring that the curd sets perfectly.
Step 2: In a medium bowl, cream together the softened butter and sugar until light and fluffy.
Creaming the butter and sugar together incorporates air into the mixture, resulting in a lighter crust. This step is crucial for achieving that tender texture in your base.
Step 3: Add the flour and salt to the creamed mixture, mixing until just combined.
Be careful not to overmix at this stage to prevent a tough crust. Mixing until just combined ensures that the texture remains tender, perfect for complementing the curd.
Step 4: Press the crust mixture evenly into the bottom of a greased 8×8-inch baking pan.
Pressing the crust firmly helps it hold together during baking. It is important to create an even layer to ensure consistent baking and avoid a soggy base.
Step 5: Bake the crust for 15 minutes or until lightly golden.
Baking the crust allows it to set and develop flavor. A golden crust provides a pleasant contrast to the soft cranberry curd, enhancing the overall dessert experience.
Step 6: While the crust is baking, prepare the cranberry curd by blending cranberries in a blender or food processor until smooth.
Blending cranberries creates the necessary puree for the curd. This step helps break down the fruit's fibers, resulting in a rich, smooth filling.
Step 7: In a medium bowl, combine the cranberry puree, sugar, eggs, lemon juice, and lemon zest. Whisk until well blended.
Whisking these ingredients together ensures a uniform mixture, essential for the curd to set properly. This step also integrates the tartness of the cranberries with the sweetness and acidity of the other ingredients.
Step 8: Pour the cranberry curd mixture over the baked crust, spreading evenly.
Evenly pouring the curd over the crust helps create a uniform texture and ensures that each bite has the right balance of crust and filling.
Step 9: Return the pan to the oven and bake for an additional 20-25 minutes, or until the curd is set and slightly jiggles in the center.
This step is crucial for achieving the right consistency in the curd. It should be set but still have a slight jiggle, indicating it will firm up while cooling.
Step 10: Once done, remove from the oven and allow to cool at room temperature before refrigerating for at least two hours.
Cooling at room temperature prevents condensation and maintains the texture of the bars. Refrigerating allows the flavors to meld and the curd to firm up completely.
Step 11: Cut into squares and serve chilled, garnishing with powdered sugar if desired.
Cutting the bars after they have chilled ensures clean edges. Offering them with a dusting of powdered sugar adds a touch of elegance and sweetness to the tangy bars.

Choosing the Right Cranberries
When selecting cranberries for your curd bars, opt for fresh ones when in season, or high-quality frozen cranberries if they are not available. Fresh cranberries should be firm and plump, with a deep red color. If you're using frozen, allow them to thaw before blending for a smoother puree. Each choice will impact the final flavor and texture of the curd.
The Importance of Zest
Incorporating lemon zest is more than just a garnish—it elevates the flavor profile of your cranberry curd. The aromatic oils in the zest enhance the brightness of the tart cranberries, creating a more complex taste. This small addition transforms ordinary curd into a flavorful experience that lingers, highlighting the wonderful balance of sweet and sour.
Perfecting the Crust
A good crust sets the stage for tantalizing curd. It's essential to ensure it's baked just until golden to avoid a dry or overly crumbly texture. If the crust is pressed firmly and evenly into the pan, it will provide stability for the curd above. This careful investment in the crust will pay off with each delightful slice.
FAQs
What can I do if my cranberry curd is too thin?
If your cranberry curd seems too thin after baking, it's likely undercooked. Ensure the curd is fully set with only a slight jiggle in the center before removing it from the oven.
Can I use a different type of fruit for the curd?
Yes, other berries like raspberries or blueberries can replace cranberries. Just keep in mind that different fruits may alter the sweetness or tartness of the curd.
What should I do if the crust is too crumbly?
If the crust turns out crumbly, it may need more butter or a bit of water. Ensure that the butter is softened enough to incorporate fully and binds the ingredients.
How can I adjust the sweetness of the curd?
If you'd like a sweeter curd, you can increase the sugar slightly, but be cautious not to overpower the cranberry tartness. Taste before pouring the mixture over the crust.
What if I want to make a larger batch?
To scale the recipe, simply double the ingredients and use a larger baking pan. Bake times may vary, so check for doneness with added layers.
Why is my curd bland?
A bland curd could be due to insufficient seasoning or not enough acidity. Ensure you use fresh lemon juice and adjust the sugar to enhance the flavor balance.
Conclusion
Cranberry curd bars are a fantastic way to showcase the flavors of this beautiful and tart fruit. With a buttery crust and a smooth, tangy filling, they are a delicious treat for any occasion.
Whether enjoyed on their own or paired with a dollop of whipped cream, these bars will surely be a hit at your next gathering. Happy baking, and enjoy every flavorful bite!
Recipe Card
Decadent Peppermint Mocha Cake for Every Occasion
Ingredients
- 2 cups all-purpose flour
- 1 and ¾ cups granulated sugar
- ¾ cup unsweetened cocoa powder
- 1 and ½ teaspoons baking powder
- 1 and ½ teaspoons baking soda
- 1 teaspoon salt
- 2 large eggs
- 1 cup whole milk
- ½ cup vegetable oil
- 2 teaspoons vanilla extract
- 1 cup hot brewed coffee
- 1 teaspoon peppermint extract
- 1 cup heavy cream
- ½ cup powdered sugar
- Crushed peppermint candies for garnish
Instructions
- Preheat your oven to 350°F (175°C) and prepare your cake pans.
- In a large mixing bowl, sift together the flour, sugar, cocoa powder, baking powder, baking soda, and salt.
- In a separate bowl, whisk together the eggs, milk, oil, vanilla extract, hot coffee, and peppermint extract until well combined.
- Gradually add the wet ingredients to the dry ingredients, mixing until just combined.
- Divide the batter evenly between the prepared pans and smooth the tops with a spatula.
- Bake for 30-35 minutes, or until a toothpick inserted in the center comes out clean.
- Allow the cakes to cool in the pans for 10-15 minutes before transferring them to wire racks to cool completely.
- While the cakes cool, prepare the frosting by whipping the heavy cream and powdered sugar together until soft peaks form.
- Once cooled, frost the top of one cake layer, then gently place the second layer on top and frost the top and sides of the entire cake.
- Decorate the top with crushed peppermint candies for an added festive touch.
- Slice and serve your delicious peppermint mocha cake to enjoy!
Notes
Additional serving suggestions: pair with a crisp salad, garlic bread, or roasted seasonal vegetables for balance.
For make-ahead, prep components separately and assemble just before heating to preserve texture.
Taste and adjust with acid (lemon/vinegar) and salt right at the end to wake up flavors.


