Introduction
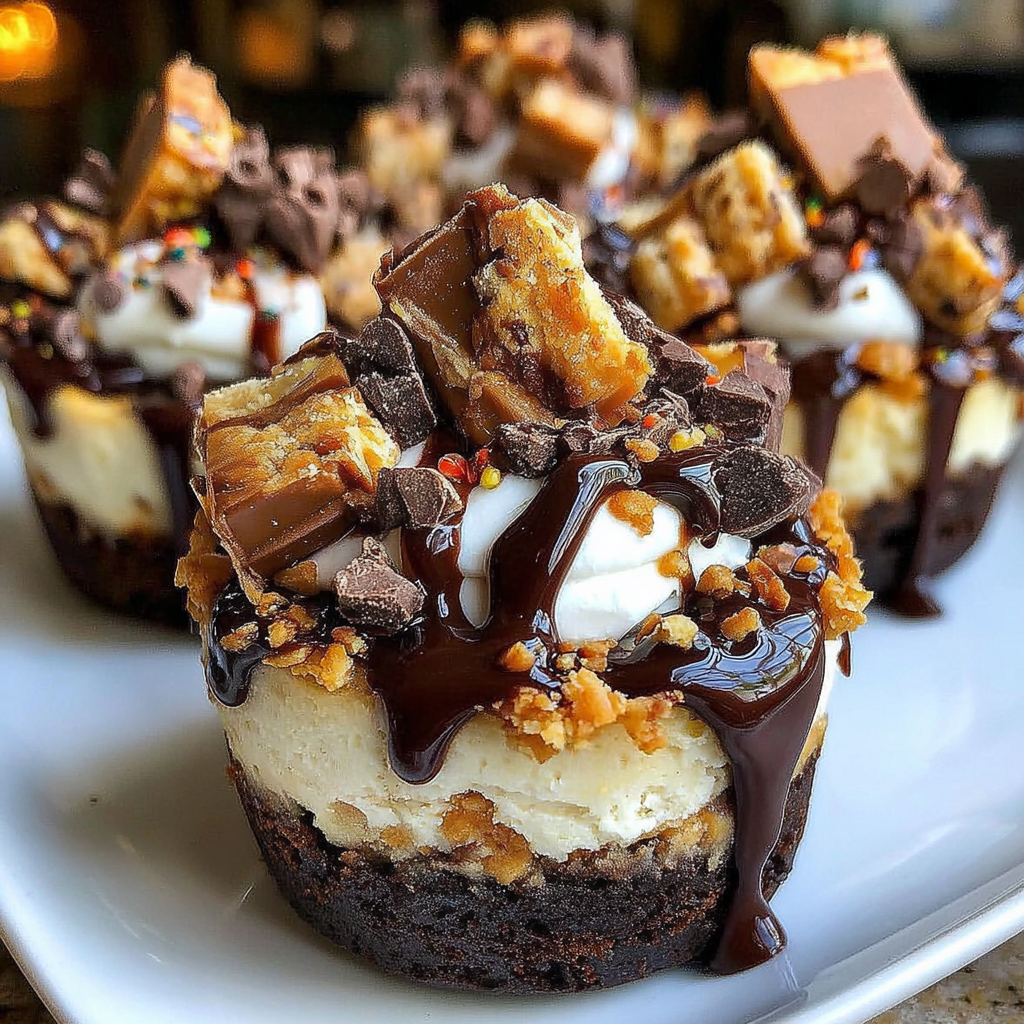
Indulging in dessert is a timeless pleasure, and Loaded Brownie Cheesecake Cups elevate that experience to a whole new level. Combining rich brownie goodness with creamy cheesecake, these bite-sized delights are perfect for satisfying your sweet tooth.
Each cup offers a harmonious blend of textures and flavors, making them a show-stopping treat for any occasion. Whether it’s a family gathering, a dinner party, or just a fun night in, these luscious desserts will leave everyone craving more.
Ingredients
- 1 cup unsalted butter
Butter provides moisture and richness to both the brownie and cheesecake layers. Using unsalted butter allows for better control over the sodium content in the recipe. - 1 cup granulated sugar
Sugar not only sweetens the dessert but also contributes to the overall texture. It helps the brownie layer achieve that fudgy consistency we all love. - 1 cup light brown sugar
Brown sugar adds a deeper flavor due to its molasses content, giving the brownie layer a rich, caramel-like taste that complements the cheesecake layer. - 4 large eggs
Eggs act as a binding agent and help with the leavening, ensuring the brownies set properly while also adding richness to the cheesecake. - 1 cup all-purpose flour
Flour provides the structure for the brownies. The right amount ensures they remain fudgy rather than turning cake-like. - 1/2 cup unsweetened cocoa powder
Cocoa powder imparts the deep chocolate flavor that is essential for brownies, contributing to their indulgent nature. - 1 cup cream cheese (softened)
Cream cheese is the star of the cheesecake layer, providing a creamy texture and tangy flavor that balances the sweetness of the brownie. - 1/2 cup sour cream
Sour cream adds a tangy depth to the cheesecake while also contributing moisture, ensuring a smooth and decadent filling. - 1 cup semi-sweet chocolate chips
Chocolate chips add extra chocolate flavor and texture to the brownie base, enhancing the overall richness of the dessert. - 1/2 cup chopped nuts (optional)
Nuts provide crunch and additional flavor. They can be omitted or substituted based on personal preference. - 1 tsp vanilla extract
Vanilla enhances the overall flavor profile, adding warmth and depth to both the brownie and cheesecake layers.
Directions & Preparation
Step 1: Preheat your oven to 350°F (175°C) and line a cupcake pan with liners.
Preheating ensures that the brownies bake evenly from the moment they go into the oven. Lining the pan makes removing the cups easier and helps with cleanup. Make sure the liners are securely placed to avoid any mess.
Step 2: In a medium saucepan, melt the butter over low heat.
Melting the butter on low heat allows for a smooth texture without burning it. This is crucial for integrating well with the sugars, which will create that fudge-like base for the brownies.
Step 3: Remove the saucepan from the heat and whisk in the granulated sugar and brown sugar until combined.
Whisking the sugars into the melted butter helps dissolve them, which aids in achieving a smooth brownie batter. The combined sweetness will enhance the dessert without being overly sugary.
Step 4: Add the eggs one at a time, whisking well after each addition.
Incorporating the eggs gradually ensures a uniform mixture, preventing the batter from curdling. This technique contributes to a light texture while maintaining the rich flavor.
Step 5: Stir in the vanilla extract and melted cocoa powder.
Adding vanilla and cocoa powder at this stage ensures their flavors are fully integrated into the batter. The cocoa adds rich chocolate flavor, while the vanilla brings a delightful aroma.
Step 6: Gently fold in the flour and chocolate chips until just combined.
Overmixing can lead to tough brownies; gently folding helps maintain a tender texture. The addition of chocolate chips at this stage boosts the chocolate experience of every bite.
Step 7: In a separate bowl, beat the cream cheese with the sour cream until smooth and fluffy.
This step is essential for achieving a creamy cheesecake layer. Properly mixing the cream cheese and sour cream ensures there will be no lumps, leading to a silky-smooth filling.
Step 8: Add sugar and vanilla extract to the cream cheese mixture and beat until well combined.
Incorporating sugar into the cream cheese mixture enhances sweetness and balances the flavors between the cheesecake and brownie layers. Vanilla enriches the overall taste.
Step 9: Fill each cupcake liner halfway with brownie batter, then add a spoonful of the cheesecake mix on top.
Filling the liners halfway allows the cheesecake to sit comfortably on top of the brownie base without overflowing during baking. This layering is what creates that beautiful appearance of the cups.
Step 10: Top each cup with more brownie batter until three-quarters full.
Ensuring the cups are filled to the right level is key to preventing any overflow while baking. The mix of brownie and cheesecake should create a harmonious balance once baked.
Step 11: Bake in the preheated oven for 25-30 minutes, or until a toothpick inserted comes out with moist crumbs.
Baking the cups at the right temperature and time ensures a fudgy center without undercooking them. Checking with a toothpick allows you to gauge doneness accurately without overbaking.
Step 12: Let the cups cool completely in the pan before removing them.
Cooling the cups allows them to set properly and makes them easier to handle. If removed too soon, they may crumble or stick to the liners.
Step 13: Chill in the refrigerator for at least an hour before serving.
Chilling enhances the flavors and improves the texture, allowing the cheesecake layer to firm up. This step is crucial for achieving the ideal bite and ensuring the cups hold their shape.

Customize Your Loaded Brownie Cups
Personalizing your Loaded Brownie Cheesecake Cups is part of the fun. Try adding different toppings such as crushed Oreos, caramel drizzle, or even fruit like raspberries for a refreshing contrast. Mixing in flavors like mint extract or espresso powder can also elevate these cups with unique notes. Make this dessert truly your own by experimenting with flavors and textures.
Perfect Pairings for Your Dessert
These decadent loaded brownie cheesecake cups pair beautifully with a variety of beverages. A tall glass of cold milk complements the richness of the chocolate, while a cup of espresso or coffee enhances the dessert's flavors. For a celebratory touch, serve alongside dessert wines or liqueurs that highlight the chocolate notes. These pairings can elevate your dessert experience to new heights.
Tips for Successful Baking
To ensure your loaded brownie cheesecake cups turn out perfectly, follow a few key tips. Always use room-temperature ingredients which facilitate easier mixing and a smoother batter. Measure ingredients precisely to maintain balance in flavors and textures. Finally, don't rush through the cooling process; proper cooling is vital for maintaining structure when serving. These small details can make a big difference in the outcome.
FAQs
What should I do if my brownie mixture is too thick?
If the brownie mixture feels too thick, you can add a tablespoon of melted butter or water to loosen it up slightly. Be sure not to add too much, as you want to maintain the fudgy texture.
What type of chocolate chips should I use for the best flavor?
Using semi-sweet chocolate chips provides the perfect balance of sweetness and chocolate richness. You can also experiment with dark or milk chocolate chips based on your preference.
Can I use flavored cream cheese for a twist?
Absolutely! Flavored cream cheeses, like chocolate or raspberry, can add an exciting element to the cheesecake layer, giving a distinctive flavor that complements the brownie.
What if my cheesecake layer is too runny?
If your cheesecake layer is too runny, it may be due to overmixing or not chilling long enough. Make sure to blend just until smooth and refrigerate for a longer period to help it set.
How can I adjust the sweetness if it's too overwhelming?
If the dessert turns out too sweet, consider adding a pinch of salt to contrast the sweetness or pairing it with a slightly tart side, like fresh fruit or yogurt.
Can I make these cups in mini versions?
Definitely! Simply reduce the baking time to 15-20 minutes for mini versions. They're a great bite-sized treat that can be even more fun at gatherings.
Conclusion
Creating Loaded Brownie Cheesecake Cups is not only gratifying but also a rewarding way to introduce a unique dessert in your home. With a combination of chocolatey goodness and creamy texture, they are guaranteed to impress friends and family alike.
Whether served at a gathering or enjoyed as a personal treat, these cups cater to every chocolate lover's dreams. With a few key techniques and the right ingredients, you’ll be able to recreate this delightful dessert effortlessly.
Recipe Card
Decadent Loaded Brownie Cheesecake Cups Recipe
Ingredients
- 1 cup unsalted butter
- 1 cup granulated sugar
- 1 cup light brown sugar
- 4 large eggs
- 1 cup all-purpose flour
- 1/2 cup unsweetened cocoa powder
- 1 cup cream cheese softened
- 1/2 cup sour cream
- 1 cup semi-sweet chocolate chips
- 1/2 cup chopped nuts optional
- 1 tsp vanilla extract
Instructions
- Preheat your oven to 350°F (175°C) and line a cupcake pan with liners.
- In a medium saucepan, melt the butter over low heat.
- Remove the saucepan from the heat and whisk in the granulated sugar and brown sugar until combined.
- Add the eggs one at a time, whisking well after each addition.
- Stir in the vanilla extract and melted cocoa powder.
- Gently fold in the flour and chocolate chips until just combined.
- In a separate bowl, beat the cream cheese with the sour cream until smooth and fluffy.
- Add sugar and vanilla extract to the cream cheese mixture and beat until well combined.
- Fill each cupcake liner halfway with brownie batter, then add a spoonful of the cheesecake mix on top.
- Top each cup with more brownie batter until three-quarters full.
- Bake in the preheated oven for 25-30 minutes, or until a toothpick inserted comes out with moist crumbs.
- Let the cups cool completely in the pan before removing them.
- Chill in the refrigerator for at least an hour before serving.
Notes
Additional serving suggestions: pair with a crisp salad, garlic bread, or roasted seasonal vegetables for balance.
For make-ahead, prep components separately and assemble just before heating to preserve texture.
Taste and adjust with acid (lemon/vinegar) and salt right at the end to wake up flavors.


