Introduction
The festive season arrives bearing scents of pine, spices, and most importantly, peppermint. Among the many delights of holiday baking, a standout creation is Chocolate Peppermint Bread. This indulgent loaf combines rich chocolate with refreshing peppermint, creating a harmonious balance that brightens any dessert table.
Baked with love, this bread is not just delicious but also wonderfully aromatic. It captures the essence of the holidays, making it an ideal choice for gift-giving or celebrating with family and friends. Each slice is a delightful treat, perfect for a cozy winter evening or as a delightful breakfast alongside your favorite coffee.
Ingredients
- 2 cups all-purpose flour
Flour forms the base of the bread, providing structure and stability. Using all-purpose flour ensures a balanced texture that isn't too airy or too dense. - 1 cup granulated sugar
Sugar adds sweetness, and contributes to the browning of the bread's crust during baking. It also helps to retain moisture, keeping the bread soft. - ½ cup unsweetened cocoa powder
Cocoa powder infuses the bread with deep chocolate flavor, providing richness. It also aids in the bread's color, making it visually appealing. - 1 teaspoon baking soda
Baking soda is a leavening agent that helps the bread rise, contributing to its light texture. It works best in conjunction with acidic components like buttermilk. - ½ teaspoon salt
Salt enhances the overall flavor of the bread, balancing sweetness and bringing out the chocolate notes. It also plays a role in strengthening the dough. - 1 cup buttermilk
Buttermilk adds moisture and a slight tanginess, which complements the sweetness. Its acidity responds with baking soda to create lift, making the bread fluffy. - ½ cup vegetable oil
Oil provides moisture and a tender crumb, preventing the bread from becoming dry. It also helps to enhance the flavor without the heaviness of butter. - 2 large eggs
Eggs bind the ingredients together and contribute to the bread's structure and richness. They also help with leavening and add nutritional value. - 1 teaspoon peppermint extract
Peppermint extract brings the signature holiday flavor to the bread, uplifting the chocolate profile. It's essential for achieving that refreshing taste. - 1 cup chocolate chips
Chocolate chips add bursts of melty chocolate flavor throughout the bread. They create a delicious contrast in texture and enhance the overall indulgence. - 1/2 cup crushed peppermint candy
Crushed peppermint candy offers a crunchy texture and reinforces the peppermint flavor. It also makes for a festive decoration on top of the bread.
Directions & Preparation
Step 1: Preheat the oven to 350°F (175°C) and prepare your loaf pan.
Preheating the oven ensures even baking, allowing your bread to rise properly. Greasing or lining the loaf pan prevents sticking, which can be frustrating later when you’re eager to enjoy your creation.
Step 2: In a large mixing bowl, whisk together the dry ingredients: flour, sugar, cocoa powder, baking soda, and salt.
By mixing the dry ingredients first, you help to evenly distribute the leavening agents and cocoa. This prevents clumps and ensures that each slice of bread has a uniform flavor and texture.
Step 3: In another bowl, combine the wet ingredients: buttermilk, oil, eggs, and peppermint extract.
Combining wet ingredients separately allows for better emulsification, resulting in a smoother batter. The richness from the eggs and the moisture from the buttermilk contribute significantly to the bread’s overall texture.
Step 4: Gradually mix the wet ingredients into the dry ingredients until just combined.
Overmixing can lead to a tough bread, so it's important to mix just until moistened. This approach will keep the bread tender and fluffy; small lumps are perfectly fine.
Step 5: Fold in the chocolate chips and crushed peppermint candy gently.
Folding in these ingredients rather than stirring helps maintain the airiness of the batter. This step ensures that the delicious bits of chocolate and peppermint are evenly distributed throughout the loaf.
Step 6: Pour the batter into your prepared loaf pan, smoothing the top.
Smoothing the top helps with even baking and appearance. It’s essential to fill the pan only about two-thirds full to allow for rising during baking without overflowing.
Step 7: Bake in the preheated oven for 50-60 minutes, or until a toothpick inserted in the center comes out clean.
Baking at the right temperature and duration is crucial for achieving a perfect loaf. The toothpick test is a reliable method to check doneness while avoiding overbaking, which can dry out the bread.
Step 8: Allow the bread to cool in the pan for about 10 minutes before transferring it to a wire rack to cool completely.
Cooling in the pan allows the bread to firm up, making it easier to remove without breaking. Transferring it to a wire rack ensures even cooling, preventing sogginess on the bottom.
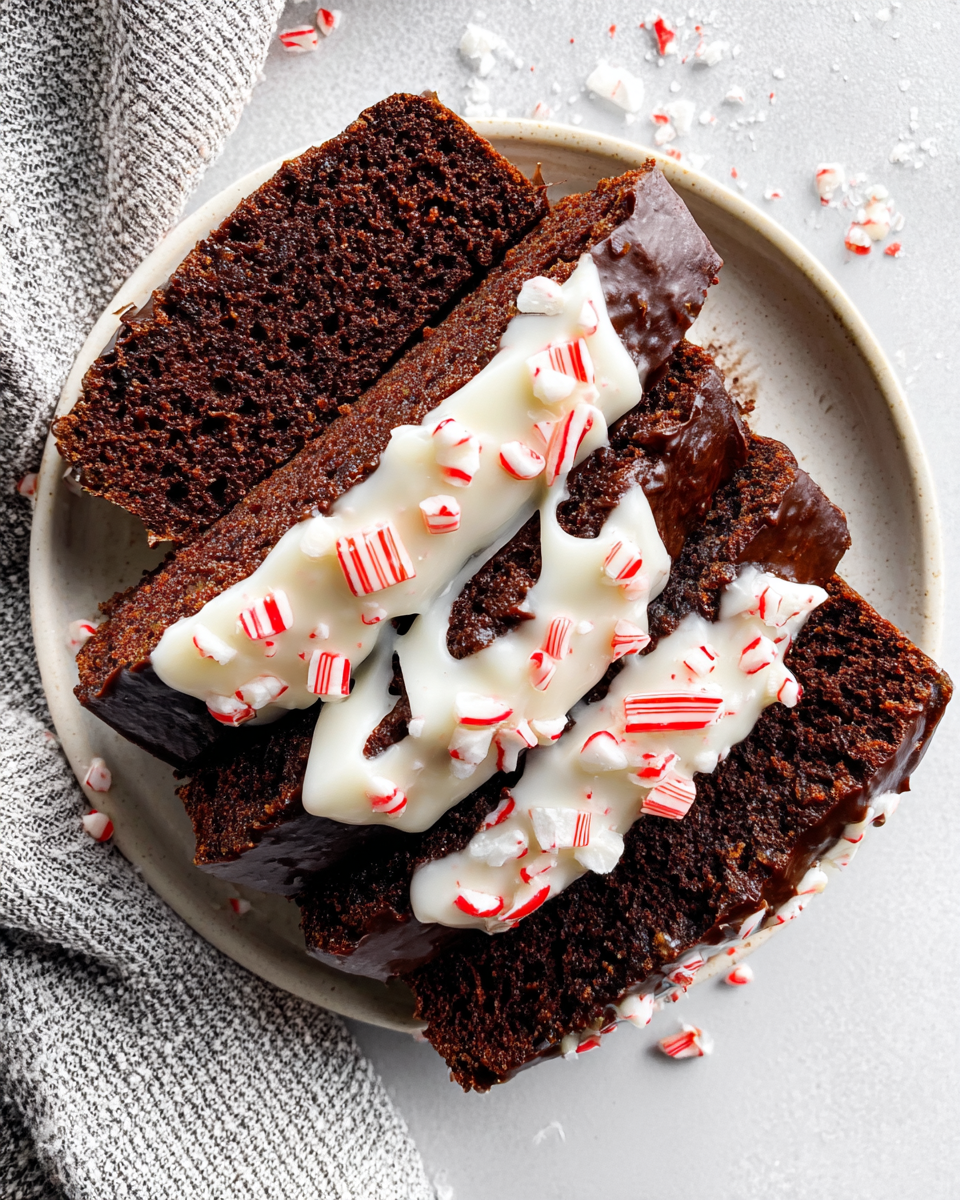
Step 9: Once cooled, slice and serve, optionally drizzling with melted chocolate and additional crushed peppermint on top.
Finishing touches add visual appeal and extra flavor. The melted chocolate creates a decadent finish, while more peppermint enhances that festive touch, making it even more delightful for guests.

The Perfect Holiday Gift: Chocolate Peppermint Bread
Nothing says 'I care' quite like a homemade treat. Chocolate Peppermint Bread makes for an excellent gift during the holiday season. Wrapped in cellophane and tied with a festive ribbon, this bread is a thoughtful gesture that family and friends are sure to appreciate. Not only does it look appealing, but its flavor delivers a delightful surprise that captures the essence of the holidays.
Customizing Your Chocolate Peppermint Bread
This recipe provides a solid foundation to explore your creativity. Consider adding a swirl of cream cheese or a handful of nuts for added texture. You can also experiment with dark chocolate versus semi-sweet chips, adjusting the sweetness to your preference. With a few tweaks, you can ensure this bread is tailored to your taste, making it even more special for your loved ones.
Serving Suggestions: Elevate Your Bread Experience
Pair slices of your Chocolate Peppermint Bread with a hot beverage like cocoa or coffee for a delightful afternoon treat. For an extra festive touch, serve it as part of a dessert platter alongside other holiday favorites. A scoop of vanilla ice cream or a dollop of whipped cream on the side can transform your bread into a deliciously indulgent dessert experience, perfect for holiday gatherings.
FAQs
What should I do if the batter is too thick?
If your batter appears too thick, try adding a tablespoon of milk or buttermilk at a time until achieving a smoother consistency. Be cautious not to add too much, as this could affect the final texture.
How can I make the bread less sweet?
Reducing the sugar by a quarter cup can help balance the sweetness without compromising the bread's texture. You could also consider using dark chocolate chips for a deeper chocolate flavor.
What if the bread sinks in the middle after baking?
A sunken bread may result from underbaking or adding too many wet ingredients. Always ensure thorough baking, and measure your wet ingredients carefully to maintain the right consistency.
Can I use different types of chocolate chips?
Certainly! Experimenting with milk chocolate, dark chocolate, or even white chocolate chips can offer diverse flavor profiles. Just be mindful of adjusting the sugar depending on the chocolate's sweetness.
What if the bread doesn't rise properly?
If the bread does not rise as expected, it may be due to expired baking soda. Always check the freshness of your leavening agents before baking for best results.
Is there a way to enhance the peppermint flavor further?
Adding additional crushed peppermint candy or a little more peppermint extract can elevate the flavor. However, be careful not to overpower the chocolate; balance is key!
Conclusion
Chocolate Peppermint Bread is more than just a dessert; it’s a celebration of the flavors of the holiday season. Its rich chocolate and refreshing peppermint combine to create an unforgettable treat that is sure to be a hit with everyone.
By making this bread, you create joyful memories in the kitchen, filled with the enticing aromas of chocolate and peppermint. Whether you indulge yourself or share with loved ones, this bread will surely add warmth and happiness to your holiday festivities.
Recipe Card

Deliciously Creamy Cheesy Garlic Scalloped Potatoes
Ingredients
- 4 large russet potatoes
- 2 cups heavy cream
- 1 cup shredded sharp cheddar cheese
- 1 teaspoon garlic powder
- 1 teaspoon salt
- 1/2 teaspoon black pepper
- 1 tablespoon butter
- 1/4 cup grated Parmesan cheese
Instructions
- Preheat the oven to 375°F (190°C).
- Wash and peel the potatoes, then slice them thinly using a mandoline or sharp knife.
- In a large bowl, mix together the heavy cream, garlic powder, salt, and black pepper.
- Add half of the sliced potatoes to a greased baking dish, followed by half of the cream mixture and half of the cheddar cheese.
- Repeat the layers with the remaining potatoes, cream mixture, and top with remaining cheese.
- Dot the top with butter and sprinkle the grated Parmesan cheese over.
- Cover the baking dish with foil and bake for 45 minutes.
- After 45 minutes, remove the foil and bake for an additional 20-25 minutes until golden brown and bubbling.
- Let the dish sit for about 10 minutes before serving.
Notes
Additional serving suggestions: pair with a crisp salad, garlic bread, or roasted seasonal vegetables for balance.
For make-ahead, prep components separately and assemble just before heating to preserve texture.
Taste and adjust with acid (lemon/vinegar) and salt right at the end to wake up flavors.


