Introduction
Strawberry Custard Delight Cake is a delightful dessert that combines the freshness of strawberries with a creamy custard filling. This elegant cake is perfect for special occasions or even a casual family gathering. Each bite offers a harmonious blend of flavors that is sure to impress anyone who tastes it.
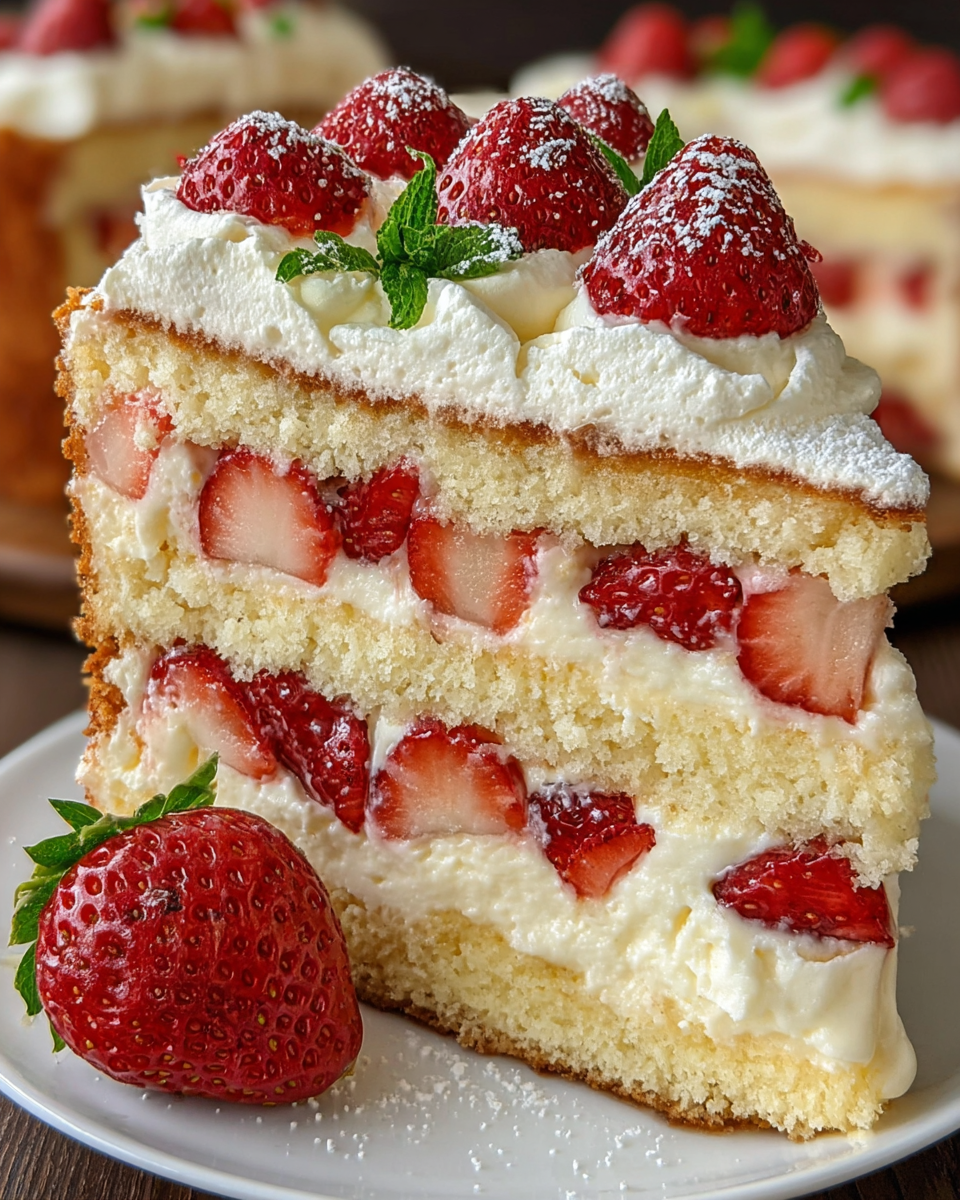
The cake features a light, airy sponge that provides a wonderful base for the rich, velvety custard. Topped with vibrant strawberries, this dessert not only pleases the palate but also delights the eyes. By making this cake, you’ll create not just a dessert, but an experience that brings joy to your kitchen.
Ingredients
- 1 cup all-purpose flour
All-purpose flour acts as the foundation of the sponge cake, providing structure and stability. The right protein content allows the cake to rise while remaining tender. - 1 cup granulated sugar
Sugar not only sweetens the cake but also contributes to its texture. It helps create a moist and tender crumb while caramelizing at the edges for added flavor. - 4 large eggs
Eggs serve multiple purposes, acting as a binding agent, leavening the cake, and contributing to the flavor. They also help to create a rich, custardy texture in the filling. - 1/2 cup unsalted butter (melted)
Butter adds richness and moisture to the cake, helping to create a soft and tender crumb. Its fat content also enriches the custard filling, enhancing the flavor. - 2 cups strawberries (sliced)
Strawberries bring freshness and natural sweetness to the cake. Their juice seeps into the cake layers, enhancing flavor while providing a beautiful presentation. - 1 cup whole milk
Milk adds moisture to both the cake and custard. Its fat content enhances the creaminess of the custard filling while helping the sponge cake stay soft. - 1/4 cup cornstarch
Cornstarch thickens the custard filling, giving it a smooth, velvety texture. It helps to set the custard without making it too heavy. - 2 teaspoons vanilla extract
Vanilla extract provides a lovely aroma and enhances the overall flavor profile of the cake and custard. It adds warmth and depth that perfectly complements the strawberries. - 1 tablespoon baking powder
Baking powder is a leavening agent that helps the cake rise. It produces carbon dioxide when mixed with wet ingredients, creating air bubbles that lighten the batter. - 1 pinch salt
Salt enhances the sweetness of the cake and balances flavors. It also strengthens the gluten structure in the flour, contributing to a better texture.
Directions & Preparation
Step 1: Preheat your oven to 350°F (175°C).
Preheating the oven is crucial for ensuring that the cake bakes evenly. It allows the batter to start cooking at the right temperature, ensuring a better rise and optimal texture from the very beginning.
Step 2: Prepare your cake pans by greasing and flouring them.
Greasing and flouring the pans prevents the cake layers from sticking, allowing for easy removal once baked. This step is vital for maintaining the shape and integrity of the cake.
Step 3: In a large mixing bowl, whisk together the eggs and sugar until light and fluffy.
Whisking the eggs and sugar aerates the mixture, which contributes to a light sponge. This initial step sets the stage for a cake that is both tender and airy, which is key to a delightful texture.
Step 4: Add the melted butter and vanilla extract to the egg mixture, mixing well.
Incorporating melted butter and vanilla enhances the cake's richness and flavor. The fat from the butter will add moisture, while vanilla infuses a delightful aromatic quality.
Step 5: In a separate bowl, combine flour, baking powder, and salt.
Mixing the dry ingredients separately ensures even distribution of the leavening agent and salt, preventing any clumps and promoting uniform rise in the cake.
Step 6: Gradually fold the dry ingredients into the wet mixture.
Folding helps to preserve the air bubbles created during whisking, ensuring the cake remains light. Be gentle to avoid over-developing gluten, which can lead to a dense texture.
Step 7: Pour the batter equally into the prepared pans and smooth the tops.
Dividing the batter evenly ensures that both layers bake at the same rate, allowing for even stacking later. Smoothing the tops also helps with even rising and gives a neat appearance.
Step 8: Bake in the preheated oven for 25-30 minutes, or until a toothpick comes out clean.
The baking process develops flavor and texture. The toothpick test is a reliable cue for doneness; the cake should spring back when lightly pressed. Don’t open the oven door too soon to prevent collapse.
Step 9: Allow the cakes to cool in the pans for 10 minutes before transferring to a wire rack.
Cooling in the pan helps the layers set, making them easier to remove without breaking. Transferring them to a wire rack allows for even cooling, which is essential for the final texture.
Step 10: While the cake cools, prepare the custard filling.
Timing is important; preparing the custard while the cake cools ensures that it's ready when the layers are assembled. This way, the custard can be used while still warm for easier spreading.
Step 11: In a saucepan, heat the milk gently until warm, then whisk in cornstarch and sugar until dissolved.
Gently warming the milk helps the cornstarch dissolve better, resulting in a smoother custard. Avoid boiling at this stage, as overheating can impact the texture and flavor.
Step 12: Cook the mixture on medium heat, stirring constantly until thickened.
Stirring continuously prevents lumps from forming and ensures even cooking. Cooking until thickened is crucial; the custard should be thick enough to hold its shape when spread between the cake layers.
Step 13: Remove from heat and whisk in butter and vanilla until smooth.
Adding butter and vanilla post-cooking enhances the flavor and smoothness of the custard. This step also enriches the filling, creating a luxurious texture that complements the cake beautifully.
Step 14: Once the cakes are completely cool, place one layer on a serving plate and spread with a layer of custard.
Assembling the cake while the layers are cool prevents melting and ensures clean edges. Generously spreading the custard allows for a rich, creamy center that balances the cake flavors.
Step 15: Top with sliced strawberries and place the second cake layer on top.
Slicing and layering the strawberries not only enhances the visual appeal but also adds a fresh burst of flavor. Properly aligning the second layer helps maintain stability for your finished cake.
Step 16: Finish with more custard on top and decorate with remaining strawberries.
A final layer of custard creates a beautiful layer that encapsulates the cake's flavors while providing moisture. Decorating with fresh strawberries not only enhances presentation but also emphasizes the dessert’s fruity character.
Step 17: Chill the completed cake in the refrigerator for at least an hour before serving.
Chilling allows the layers to set, making the cake easier to slice and enhancing the flavors as they meld together. The cold freshens up the dessert, creating a refreshing taste.

Embracing Freshness: Choosing Strawberries
The choice of strawberries can make or break your Strawberry Custard Delight Cake. Opt for vibrant, ripe strawberries with a sweet scent. Freshness ensures the cake is bursting with real fruit flavor, while overripe or processed berries can detract from the dessert’s overall quality. Take time to select the best strawberries at the market, as they will elevate this dessert to new heights.
Mastering the Custard Texture
Achieving the perfect custard consistency is crucial for this cake. The custard should be thick yet pourable, allowing it to spread easily between cake layers without being runny. If you find your custard too thin, simply return it to the heat and cook a bit longer. Remember that as it cools, it will thicken further, so don’t rush this essential step. A well-made custard should be silky and smooth, enhancing every bite.
The Art of Cake Assembly
Properly assembling your Strawberry Custard Delight Cake is key to both aesthetics and flavor. Make sure that your layers are completely cool before stacking to avoid melting the custard. Use a generous amount of custard between layers to create contrast and stability. Don’t worry if the final product isn’t perfect; the delicious taste will undoubtedly overshadow any imperfections—the beauty of homemade baking.
FAQs
What if my custard filling is too thick?
If your custard is too thick, gently reheat it over low heat while whisking in a little milk to loosen it. This will restore a smooth texture, perfect for spreading.
Can I use frozen strawberries instead of fresh?
While fresh strawberries are ideal for this cake, you can use frozen ones if thawed and well-drained. Keep in mind that they may be slightly softer and less vibrant in flavor.
How can I elevate the flavor for a more decadent cake?
To elevate flavor, consider adding a splash of liqueur, like Grand Marnier, to the custard or using a layer of whipped cream on top of the strawberries for added richness.
What should I do if my cake layers sink in the middle?
If the layers sink, it may be due to underbaking or overmixing the batter. Make sure to check for doneness with a toothpick and avoid vigorous mixing.
Can I make this cake into cupcakes?
Yes, you can adapt this recipe to make cupcakes by reducing the baking time to about 18-20 minutes. Fill each cupcake liner about two-thirds full for best results.
How do I adjust sweetness if the cake is too sweet?
If your cake is too sweet, consider adding a light pinch of salt to balance the flavors. You can also serve with a dollop of unsweetened whipped cream to cut the sweetness.
Conclusion
Strawberry Custard Delight Cake is a rewarding dessert that combines vibrant fresh strawberries with a luscious custard filling, perfect for any celebration. By following these directions, you'll create not just a cake, but a centerpiece that will bring joy to your table.
Remember, the secret lies in using quality ingredients and loving care as you bake. Enjoy the process and savor the compliments that come your way as friends and family indulge in your creation!
Recipe Card

Indulge in Amazing Pesto Shrimp Linguine
Ingredients
- 12 oz linguine
- 1 lb shrimp peeled and deveined
- 1 cup basil pesto
- 2 tbsp olive oil
- 3 cloves garlic minced
- Salt and pepper to taste
- ¼ cup grated Parmesan cheese
- Cherry tomatoes halved (optional)
Instructions
- Cook the linguine according to package instructions
- Sauté the garlic in olive oil
- Add the shrimp to the skillet
- Mix in the pesto and cooked linguine
- Add reserved pasta water as needed
- Season with salt and pepper
- Serve with Parmesan and optional tomatoes
Notes
Additional serving suggestions: pair with a crisp salad, garlic bread, or roasted seasonal vegetables for balance.
For make-ahead, prep components separately and assemble just before heating to preserve texture.
Taste and adjust with acid (lemon/vinegar) and salt right at the end to wake up flavors.


