Introduction
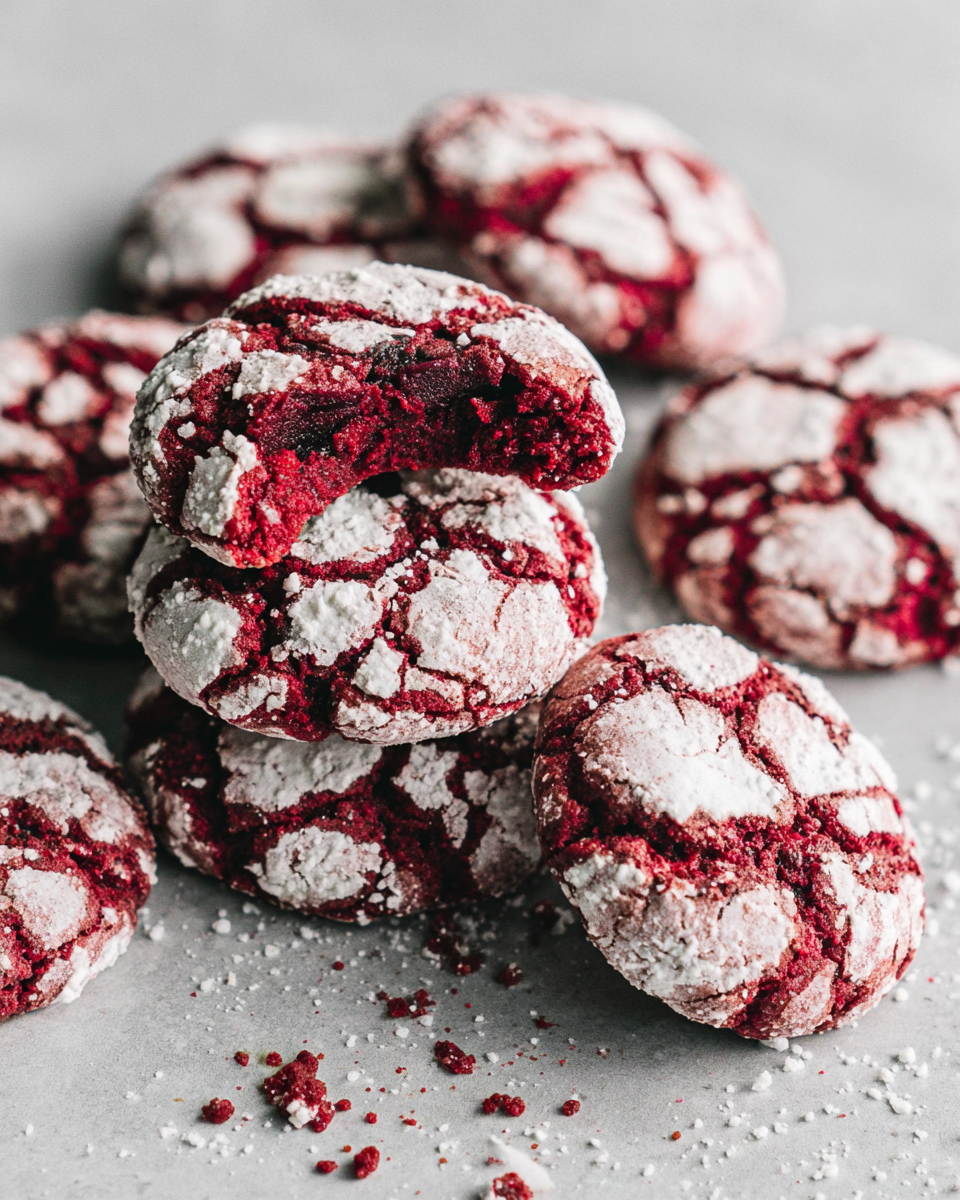
Red Velvet Crinkle Cookies fuse the rich flavors of chocolate and vanilla, resulting in a festive treat that stands out on any dessert table. Their vibrant red hue coupled with the powdered sugar-coated surface creates a visual appeal that’s hard to resist.
These cookies are not just beautiful; they are also delightfully chewy and fudgy, offering a cake-like texture that will leave you yearning for more. Perfect for holiday gatherings or cozy evenings at home, these cookies will quickly become a cherished favorite.
Whether you're an experienced baker or just starting out, the process is straightforward, ensuring a satisfying baking experience. Let’s dive into the ingredients that make these cookies a must-try!
Ingredients
- 2 cups all-purpose flour
All-purpose flour serves as the foundation for the cookies, providing structure and stability. It balances the moisture content from liquid ingredients, ensuring a chewy texture. - 1/2 cup unsweetened cocoa powder
Cocoa powder contributes a rich chocolate flavor and enhances the deeper red color of the cookies. It adds depth to the overall taste, making the cookies indulgently chocolaty. - 1 teaspoon baking powder
Baking powder is a leavening agent that helps the cookies rise during baking, resulting in a soft and fluffy texture. This lightness is essential for achieving that cake-like bite. - 1/2 teaspoon baking soda
Baking soda works in conjunction with the acidic ingredients, helping the cookies spread and giving them a slight lift. This combination ensures the perfect texture. - 1/4 teaspoon salt
Salt is critical in enhancing the flavors of the other ingredients. It balances the sweetness and rounds out the taste profile, making every bite more enjoyable. - 1/2 cup unsalted butter, softened
Butter adds richness, moisture, and flavor to the cookies. Using softened butter allows it to blend smoothly with the sugar, creating a creamy base that contributes to the cookies' texture. - 1 cup granulated sugar
Granulated sugar sweetens the cookies and aids in creating a tender texture. It also caramelizes slightly during baking, adding depth to the flavor. - 1/4 cup brown sugar
Brown sugar adds moisture due to its molasses content and creates a chewier texture. It also contributes a rich, caramel-like flavor that complements the chocolate. - 1 large egg
Eggs act as a binder, helping to hold all ingredients together. They also add moisture and assist in creating the desired cake-like structure. - 1 teaspoon vanilla extract
Vanilla extract enhances the overall flavor of the cookies, adding a warm and aromatic note that balances the richness of the cocoa. - 2 tablespoons red food coloring
Red food coloring gives these cookies their signature vibrant hue. It not only makes them visually appealing but also signifies their special festive nature. - Powdered sugar, for dusting
Powdered sugar adds a decorative touch and a hint of additional sweetness to the finished cookies, creating a pleasant contrast with the rich chocolate flavor.
Directions & Preparation
Step 1: Preheat the oven to 350°F (175°C) and line baking sheets with parchment paper.
Preheating the oven ensures that cookies bake evenly. Parchment paper prevents sticking and makes for easy cleanup, allowing the cookies to maintain their perfect shape.
Step 2: In a medium bowl, whisk together the flour, cocoa powder, baking powder, baking soda, and salt.
Whisking these dry ingredients together ensures an even distribution of the leaveners and salt. This step is crucial, as it prevents clumping and guarantees a consistent texture throughout.
Step 3: In a large bowl, beat the softened butter, granulated sugar, and brown sugar until creamy.
Creaming the butter and sugars together incorporates air, leading to a lighter cookie. This stage is vital for achieving that ideal tender, cake-like texture.
Step 4: Add the egg, vanilla extract, and food coloring to the butter mixture and beat until fully combined.
Incorporating the wet ingredients in this manner allows them to blend seamlessly, which is key for both flavor and color. Take care to fully mix to avoid streaks in the final dough.
Step 5: Gradually add the dry ingredients to the wet ingredients, mixing until just combined.
Mixing just until combined prevents excessive gluten development, which can lead to tough cookies. At this stage, it's essential to avoid overmixing for the best texture.
Step 6: Chill the dough in the refrigerator for at least 30 minutes for best results.
Chilling the dough allows the flavors to meld and the cookies to hold their shape during baking. This step is crucial for achieving thicker, crinkled cookies.
Step 7: Use a cookie scoop or tablespoon to portion the dough, then roll each ball in powdered sugar before placing it on the prepared baking sheets.
Rolling in powdered sugar creates the signature crinkle effect as the cookies spread, and it adds a sweet contrast against the rich chocolate. Leave ample space between the cookies to account for spreading.
Step 8: Bake for 10-12 minutes, until the cookies are set around the edges but still soft in the center.
Baking until just set allows the centers to remain fudgy and chewy. Overbaking will result in a dry cookie, so it's crucial to keep an eye on them as they approach the end of the baking time.
Step 9: Remove from the oven and let the cookies cool on the baking sheet for 5 minutes before transferring them to wire racks to cool completely.
Allowing the cookies to cool slightly on the baking sheet helps them firm up without losing their chewy texture. Transferring them ensures they cool down properly and don’t become soggy.

Achieving the Perfect Crinkle Effect
The distinctive crinkle effect of Red Velvet Crinkle Cookies comes from a combination of rolling them in powdered sugar and the unique baking process. As the cookies bake, they spread and the powdered sugar forms a cracked crust. For optimal results, ensure that your dough is sufficiently chilled before baking, as this allows for better shaping and enhances the overall appearance.
Exploring Flavor Variations
While traditional red velvet flavor is delightful, there are numerous variations to explore. Consider adding white chocolate chips or chopped nuts for texture and a delightful contrast to the fudgy base. You can also experiment with different extracts, such as almond or peppermint, to create a seasonal twist that perfectly complements the creamy chocolate flavor.
Serving and Pairing Suggestions
Red Velvet Crinkle Cookies are a stunning stand-alone treat, but they shine even brighter when paired with beverages. Serve them alongside a glass of cold milk or a hot cup of coffee for a delightful afternoon treat. They also make an impressive addition to holiday dessert platters or festive gatherings, providing both flavor and visual flair to your spread.
FAQs
What if my cookies are too dry?
If you find your cookies are too dry, it may be a sign of overbaking or not enough moisture in the dough. Ensure your oven temperature is accurate and watch the baking time closely.
Can I use different food coloring?
Yes, you can use different food colorings to achieve various colors, although classic red is traditional for these cookies. Keep in mind that color intensity may vary based on the type used.
What if my dough is too sticky to handle?
If the dough is overly sticky, it can be helpful to chill it longer. Keep in mind that some humidity levels can affect dough consistency, so adjust with a bit more flour if necessary.
How can I scale this recipe up for a party?
To scale up the recipe, simply double or triple the ingredient amounts according to your needs. Be sure to bake in batches to maintain consistent results.
What can I do if my cookies spread too much during baking?
If the cookies spread too much, consider chilling the dough longer before baking. Additionally, ensure your oven is at the correct temperature and that you’re not overmixing the dough.
Can I make these cookies without cocoa powder?
While cocoa powder is integral to the flavor and color, if you want a non-chocolate version, you could experiment with alternative flavors, adjusting liquid ingredients to maintain consistency.
Conclusion
Red Velvet Crinkle Cookies are a delightful treat, perfect for sharing during the holidays or at any special occasion. Their combination of rich chocolate flavor and festive appearance makes them irresistible to all who encounter them.
Baking these cookies fills your kitchen with an inviting aroma, while the process serves as a wonderful way to connect with friends or family. Enjoy making these festive delights, and don’t hesitate to share them with your loved ones!
Recipe Card
A Flavorful Take on the Classic Shrimp Po’ Boy
Ingredients
- 1 pound large shrimp peeled and deveined
- 1 cup buttermilk
- 1 cup all-purpose flour
- 1 cup cornmeal
- 1 teaspoon cayenne pepper
- 1 teaspoon paprika
- Salt and pepper to taste
- 4 hoagie rolls or French baguettes
- Lettuce shredded
- Tomato sliced
- Remoulade sauce for serving
Instructions
- Prepare the shrimp marinade.
- Combine dry ingredients for the coating.
- Heat the oil for frying.
- Coat the shrimp.
- Fry the shrimp.
- Drain and season the fried shrimp.
- Assemble the po’ boy sandwich.
- Serve immediately.
Notes
Additional serving suggestions: pair with a crisp salad, garlic bread, or roasted seasonal vegetables for balance.
For make-ahead, prep components separately and assemble just before heating to preserve texture.
Taste and adjust with acid (lemon/vinegar) and salt right at the end to wake up flavors.


