
Introduction
If you're looking for a quick and delicious meal that can satisfy your pizza cravings, look no further than crispy tortilla pizza pockets. These delightful bites combine the best elements of pizza in a portable package that's perfect for busy weeknights or casual gatherings.
With just 15 minutes of prep and cooking time, you'll have a mouthwatering dish ready to enjoy. The crispy tortillas hold all your favorite toppings, making each bite a delightful experience. Plus, this recipe is highly customizable!
Grab your tortillas, gather your ingredients, and let's delve into the hassle-free world of crispy tortilla pizza pockets.
Ingredients
- 4 large flour tortillas
Flour tortillas are the base of this recipe. They provide a soft, yet crispy exterior once cooked, allowing the pizza flavors to shine through. - 1 cup pizza sauce
Pizza sauce adds moisture and flavor to the pockets. Opt for a classic pizza sauce or a marinara for a fresh twist. - 2 cups shredded mozzarella cheese
Mozzarella cheese melts beautifully, creating a gooey, comforting filling. It can also enhance the overall flavor profile of your pockets. - 1 cup assorted toppings (pepperoni, veggies, etc.)
Your choice of toppings personalizes each pocket. Consider favorites like pepperoni, bell peppers, or olives for added texture and taste. - 1 tablespoon olive oil
Olive oil helps achieve a golden-brown crispness on the tortillas. It also adds rich flavor and prevents sticking. - 1 teaspoon Italian seasoning
This seasoning blend enhances the flavor of the pizza, offering notes of basil, oregano, and thyme that complement the other ingredients.
Directions & Preparation
Step 1: Preheat your skillet or frying pan over medium heat.
Getting the skillet hot is essential for achieving that crispy texture on the tortillas. A properly heated skillet ensures even cooking and helps the tortillas crunch up nicely. If you have a non-stick skillet, you may use it without oil, but a little olive oil enhances flavor.
Step 2: Lay a tortilla flat on a clean surface.
Spreading out the tortilla is your starting point for filling. Ensure it’s fully flat to prevent any unwelcome air pockets that could affect cooking later on. A fresh tortilla is more pliable and less prone to tearing.
Step 3: Spread about ¼ cup of pizza sauce on half of the tortilla.
Applying the sauce to just one half keeps the filling balanced, preventing sogginess. It also allows the edges to seal properly when folded, which is critical for keeping the contents inside while cooking.
Step 4: Sprinkle ⅓ cup of mozzarella cheese over the sauce.
The cheese not only enhances taste but also acts as glue, holding the toppings together. Be careful not to overfill; you want enough cheese to ooze but not spill out during cooking.
Step 5: Add your assorted toppings on top of the cheese.
This is your moment to personalize! Place a mix of toppings on the cheese, ensuring even distribution for balanced flavor in every bite. Avoid heavy toppings that could make the pocket soggy.
Step 6: Fold the tortilla in half, enclosing the filling.
By folding the tortilla, you create a pocket that traps the fillings, which is key to maintaining flavor and heat. Ensure the edges align neatly to avoid spills while cooking.
Step 7: Brush the outside with olive oil.
Brushing olive oil on the outer surface contributes to that golden-brown crisp you’re after. It also infuses a rich flavor into the tortilla, enhancing the final product.
Step 8: Carefully place the folded tortilla in the preheated skillet.
Laying the pocket in the skillet gently prevents any dislodging of cheese or toppings. The immediate heat will start crisping the outside while melting the cheese within.
Step 9: Cook for about 3-4 minutes on each side until crispy and golden.
Cooking for the right duration is critical to avoid burnt pockets while ensuring the cheese is fully melted. Use a spatula to check the color and flip only when golden brown.
Step 10: Remove from the skillet and let cool slightly before slicing.
Allowing the pockets to cool for a minute helps them set up, reducing the risk of filling spilling out when cut. The cheese will continue to ooze slightly, creating a delicious, gooey pocket.
Step 11: Serve warm with extra pizza sauce on the side if desired.
When presenting your tortilla pizza pockets, offer extra sauce for dipping. This adds an interactive element to eating and enhances the flavors. It’s the perfect opportunity to be creative with garnishing as well.

The Versatility of Tortilla Pizza Pockets
One of the best features of crispy tortilla pizza pockets is their versatility. You can mix and match sauces, cheeses, and toppings based on your preferences or whatever you have on hand. Want to make it vegetarian? Load them up with fresh vegetables. Prefer a decadent option? Add multiple types of cheese and meats. No two batches need to be the same!
Perfecting the Crispy Texture
Achieving the perfect crispy texture is all about managing the heat and cooking time. If your skillet is too hot, the tortillas may burn before the filling is adequately heated. Conversely, too low a heat may lead to soggy pockets. Play around with the settings on your stove to find the sweet spot, and consider using a cast iron skillet for a beautiful browning effect.
Dipping Sauces to Elevate Your Meal
While pizza sauce is a classic choice, don't hesitate to explore other dipping sauces to elevate your crispy tortilla pizza pockets. Ranch dressing, pesto, or even a spicy marinara can bring new flavors and excitement to an already delightful dish. Experiment with different combinations to discover your favorite pairings.
FAQs
What if my pizza pockets become too soggy?
If your pizza pockets turn out soggy, try reducing the amount of sauce you use. Too much moisture can make the tortillas lose their crispness.
Can I use corn tortillas instead of flour?
Yes, corn tortillas can be used for a gluten-free option, but they may not achieve the same level of crispiness as flour tortillas.
What can I do if the cheese doesn't melt properly?
Make sure your skillet is preheated adequately before placing the pockets. If the cheese isn’t melting, you might need to cook them a bit longer on low heat.
How can I make these pockets spicier?
To add some heat, consider topping with jalapeños, adding crushed red pepper to the sauce, or using spicy pepperoni.
What if my tortillas are breaking while I fold them?
If your tortillas are cracking, they may be too cold or stiff. Try warming them slightly in the microwave to make them more pliable.
Can I scale the recipe for a larger gathering?
Yes, simply multiply the ingredients based on how many people you're serving. Just ensure you cook them in batches if your skillet isn't large enough.
Conclusion
Crispy tortilla pizza pockets offer an exciting and quick way to enjoy all the deliciousness of pizza in a portable format. Perfect for busy days, these pockets allow you to get creative with various toppings and flavors.
Whether you’re preparing them for family dinner or a fun gathering, these taco-inspired treats are bound to be a hit. Dive into the world of crispy tortilla pizza pockets, and make your kitchen thrive with this easy and satisfying recipe.
Recipe Card
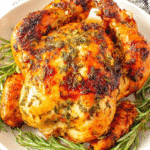
Savory Garlic Herb Roasted Chicken Delight
Ingredients
- 1 whole chicken 3-4 lbs
- 6 cloves garlic minced
- 3 tablespoons olive oil
- 2 tablespoons fresh rosemary chopped
- 2 tablespoons fresh thyme chopped
- 1 lemon zested and juiced
- Salt and pepper to taste
Instructions
- Preheat your oven to 425°F (220°C).
- Prepare the chicken by rinsing and patting it dry with paper towels.
- In a small bowl, mix the olive oil, minced garlic, chopped rosemary, chopped thyme, lemon zest, lemon juice, salt, and pepper.
- Rub the herb mixture all over the chicken, ensuring to get under the skin where possible.
- Place the chicken breast-side up on a roasting pan.
- Roast the chicken for 1 hour to 1 hour and 15 minutes, or until the internal temperature reaches 165°F (74°C).
- Let the chicken rest for 10-15 minutes before carving.
- Carve and serve your Garlic Herb Roasted Chicken.
Notes
Additional serving suggestions: pair with a crisp salad, garlic bread, or roasted seasonal vegetables for balance.
For make-ahead, prep components separately and assemble just before heating to preserve texture.
Taste and adjust with acid (lemon/vinegar) and salt right at the end to wake up flavors.


