
Introduction
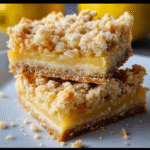
Lemon crumb bars are a delightful treat that perfectly balance sweet and tart flavors, making them an irresistible dessert for any occasion. The buttery crust combined with the zesty lemon filling creates a bright, refreshing bite that can elevate even the simplest gatherings.
These bars are not just about taste; they are also a celebration of freshness and simplicity in home cooking. With just a few key ingredients, you can whip up a batch that will impress family and friends, while indulging in the joyful act of baking. Get ready to embrace the sunny essence of lemons!
Ingredients
- 1 ¾ cups all-purpose flour
This provides the main structure of the bars. The flour helps bind the ingredients, giving the crust its sturdy base and the filling its creamy consistency. - 1 cup granulated sugar
Sugar adds sweetness, balancing the tartness of the lemon. It also contributes to the overall texture, ensuring the crust and filling have the right amount of moisture. - ½ cup unsalted butter, melted
Butter enriches the flavor and adds a richness to both the crust and filling. The fat content aids in creating a tender and crumbly texture that's essential for the crumb layer. - 2 large eggs
Eggs lend moisture and act as a binding agent, ensuring that both the crust and filling hold together well. They also contribute to the overall richness and flavor. - 1 tablespoon lemon zest
Lemon zest intensifies the citrus flavor, providing a fragrant aroma and bright acidity that shines through in both the crust and filling. - ⅓ cup freshly squeezed lemon juice
Fresh lemon juice delivers the signature tartness that defines these bars. It also adds a refreshing quality that complements the sweetness of the sugar. - ½ teaspoon baking powder
Baking powder acts as a leavening agent, ensuring that the filling rises slightly during baking. This creates a light texture that contrasts beautifully with the crumbly crust. - Pinch of salt
Salt enhances the flavors of the other ingredients, bringing out the sweetness of the sugar and the bright notes of lemon, while also balancing the overall taste.
Directions & Preparation
Step 1: Preheat your oven to 350°F (175°C) and prepare a baking dish.
Preheating the oven is crucial for even baking, as it ensures that the bars cook thoroughly from the moment they enter the oven. By preparing the baking dish with parchment paper, you make it easier to lift the bars out once cooled, ensuring clean cuts and minimal sticking.
Step 2: In a bowl, mix together the flour, sugar, and salt for the crust.
Combine the dry ingredients first to create a well-mixed base before adding wet components. This step ensures an even distribution of sugar and salt throughout the crust, which is essential for consistent flavor and texture in every bite.
Step 3: Add the melted butter to the dry ingredients and stir until crumbly.
Incorporating melted butter into the dry mixture creates a crumb texture. It's crucial to achieve that crumbly consistency, as it forms the base layer of the bars and helps them hold together without being overly dense.
Step 4: Press the crumb mixture into the bottom of the prepared baking dish.
Pressing the crumb mixture firmly into the bottom of the dish helps create a stable crust that won’t crumble apart when cut. Ensuring it's even is important for uniform cooking, so every corner of your bars gets that satisfying bite.
Step 5: Bake the crust for 15 minutes, until lightly golden.
Baking the crust before adding the filling is vital. This step allows it to firm up and creates a barrier that prevents the filling from making it soggy. A lightly golden color indicates it's ready for the lemon layer.
Step 6: In another bowl, whisk together the eggs, sugar, lemon zest, lemon juice, and baking powder.
Whisking the ingredients for the filling separately ensures a smooth consistency without any clumps of sugar or eggs. It's important to mix until frothy, as this incorporates air, helping the filling rise slightly during baking.
Step 7: Pour the lemon mixture over the baked crust.
When pouring the filling over the crust, try to do it gently to prevent disrupting the underlayer. This step is where the magic happens, as the bright lemon layer will soak into the crust, imparting flavor while baking.
Step 8: Return the dish to the oven and bake for an additional 20-25 minutes.
Baking the bars until just set ensures a soft but not overly runny filling. You'll know they're done when the edges are slightly puffed and the center looks just set but with a slight jiggle—this will firm up as it cools.
Step 9: Remove from the oven and let cool completely.
Cooling the bars completely is essential for firming up the filling and making clean cuts easier. If you attempt to cut them while warm, they'll likely crumble, so patience pays off in achieving those clean, beautiful squares.
Step 10: Dust with powdered sugar before slicing and serving.
Dusting with powdered sugar not only adds an elegant touch but also provides a sweet contrast to the tart lemon filling. This step is perfect before serving as it enhances the presentation and adds a delightful sweetness to each bite.

The Importance of Fresh Ingredients
Using fresh ingredients in lemon crumb bars is non-negotiable for achieving the best flavor. Fresh lemons provide a brighter, more vibrant taste than bottled juice, enhancing the overall quality. When selecting your produce, choose firm, fragrant lemons and zest them just before adding to the recipe to capture their aromatic oils. This attention to freshness elevates your bars immensely.
How to Achieve the Perfect Crumb Texture
The key to a successful crumb base lies in the balance of flour and melted butter. If the mixture appears too dry, a touch more butter can help bind it without sacrificing the crumbly texture. The pressing technique is equally important—aim for an even layer that doesn’t compact too tightly. An ideal crumb texture should be tender yet firm enough to support the filling and hold its shape.
Serving Suggestions for Lemon Crumb Bars
These lemon crumb bars are wonderfully versatile. Serve them plain for a light dessert with coffee or tea, or enhance them with fresh berries for a pop of color and flavor. They can also be paired with whipped cream or a dollop of Greek yogurt for a creamy contrast to the lemon's tartness. Whether enjoyed alone or dressed up, these bars promise to impress.
FAQs
What should I do if the filling turns out too runny?
If the filling is too runny after baking, it may not have set long enough. Allow it to cool completely; if it still appears too loose, consider extending the baking time slightly in future batches to achieve a firmer texture.
Is it possible to double the recipe for a larger gathering?
Absolutely! If you want to double the recipe, use a larger baking dish and keep an eye on the baking time. It may increase slightly, so check for doneness as per the appearance of the filling.
How can I tell when the bars are done baking?
The bars are done when the edges are slightly puffed, and the center has a slight jiggle. They should appear set but not overcooked, as they will continue to firm up while cooling.
Can I use bottled lemon juice instead of fresh?
While bottled lemon juice can work in a pinch, fresh juice is highly recommended for its superior flavor and acidity. Fresh lemons contain fresh oils in the zest, adding depth that's hard to replicate with bottled juice.
What if I find the bars too sweet for my taste?
If you find them too sweet, consider reducing the sugar in the filling slightly in future versions. Balancing the sweetness is key, especially with the tartness of the lemons, so adjust according to your preference.
Can I add other flavors to the filling?
Yes, you can experiment with adding flavors like ginger or lavender to the filling. Just ensure these additions complement the lemon without overwhelming its brightness.
What if the crust seems too crumbly?
If the crust seems excessively crumbly, it may not have enough melted butter, or it wasn't pressed firmly enough. In the future, adjust accordingly for a more cohesive base.
How do I adjust baking time for a smaller dish?
If using a smaller dish, keep an eye on the bars as they bake—they’ll cook faster. Start checking for doneness a few minutes earlier than the recipe suggests.
Conclusion
Lemon crumb bars bring a bright and cheerful finish to any meal, and their vibrant flavor can brighten up dull days. With their easy preparation and delightful taste, they are bound to become a regular in your baking repertoire.
Incorporating fresh ingredients and following the straightforward steps ensures that your bars turn out perfectly every time. So gather your ingredients, find a sunny spot in your kitchen, and get ready to enjoy a slice of lemony bliss!
Recipe Card
Delicious Lemon Crumb Bars to Savor at Home
Ingredients
- 1 ¾ cups all-purpose flour
- 1 cup granulated sugar
- ½ cup unsalted butter melted
- 2 large eggs
- 1 tablespoon lemon zest
- ⅓ cup freshly squeezed lemon juice
- ½ teaspoon baking powder
- Pinch of salt
Instructions
- Preheat your oven to 350°F (175°C) and prepare a baking dish.
- In a bowl, mix together the flour, sugar, and salt for the crust.
- Add the melted butter to the dry ingredients and stir until crumbly.
- Press the crumb mixture into the bottom of the prepared baking dish.
- Bake the crust for 15 minutes, until lightly golden.
- In another bowl, whisk together the eggs, sugar, lemon zest, lemon juice, and baking powder.
- Pour the lemon mixture over the baked crust.
- Return the dish to the oven and bake for an additional 20-25 minutes.
- Remove from the oven and let cool completely.
- Dust with powdered sugar before slicing and serving.
Notes
Additional serving suggestions: pair with a crisp salad, garlic bread, or roasted seasonal vegetables for balance.
For make-ahead, prep components separately and assemble just before heating to preserve texture.
Taste and adjust with acid (lemon/vinegar) and salt right at the end to wake up flavors.


