Introduction
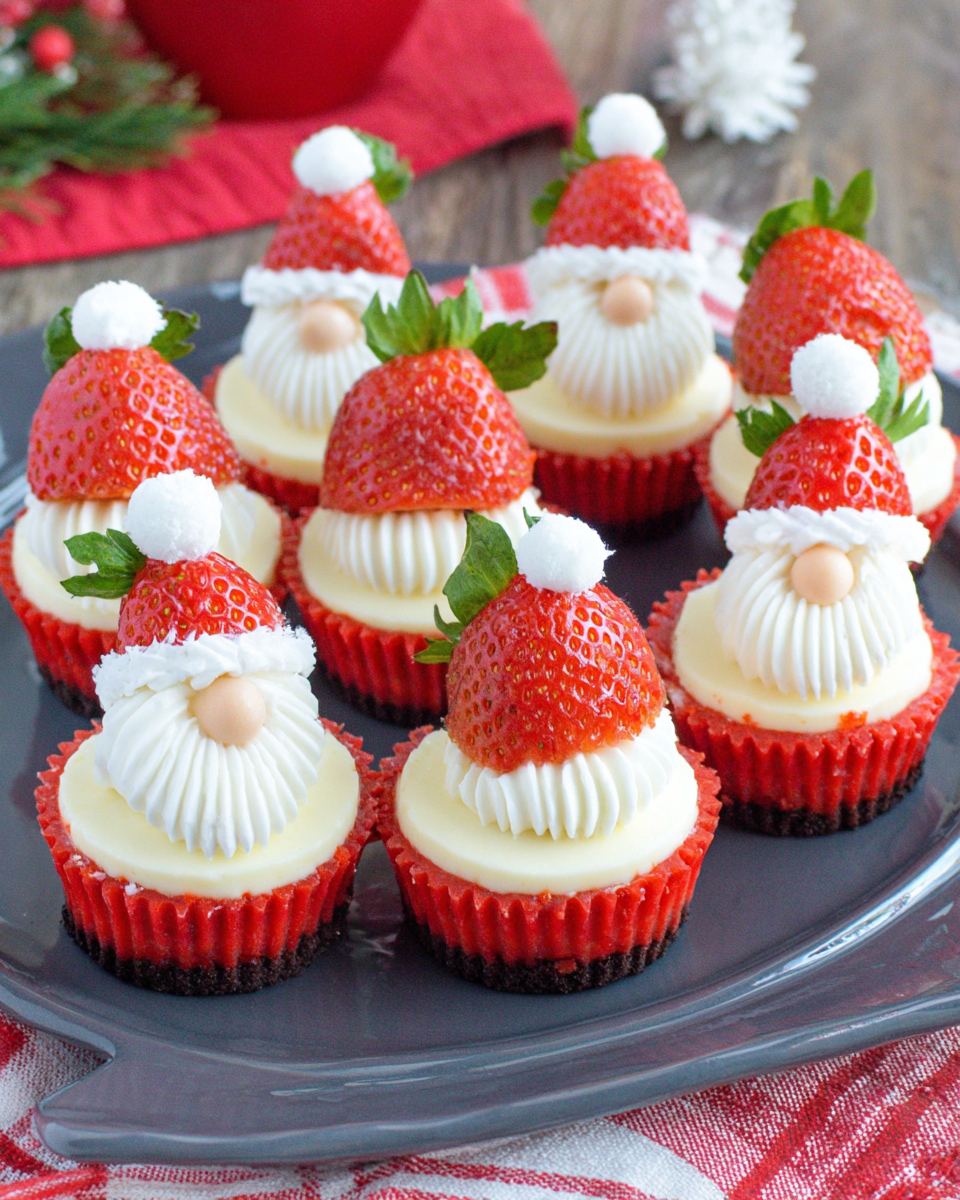
The festive season brings cheer and a host of delicious treats to enjoy. Among them, Cheesecake Strawberry Santas stand out, combining the goodness of cheesecake with a playful and charming presentation. These delightful bites are perfect for holiday gatherings, captivating guests with their festive look and delectable taste.
Using strawberries adorned with a creamy cheesecake filling, these bite-sized Santa figures are not only visually appealing but also fun to make with family. The blend of flavors, from the sweet strawberries to the velvety cheesecake, offers a delightful treat that can bring joy to any holiday table.
Ingredients
- 16 oz cream cheese, softened
Cream cheese is the main ingredient that gives the cheesecake its rich, creamy texture. Soften it to ensure it blends smoothly with the other elements, creating a harmonious filling. - 2/3 cup powdered sugar
Powdered sugar sweetens the cheesecake, providing a delicate sweetness that balances the tangy notes of cream cheese. It dissolves easily into the filling, preventing any grainy texture. - 1 tsp vanilla extract
Vanilla extract adds depth and warmth to the flavor profile. This classic ingredient enhances the overall sweetness and enriches the cheesecake's creamy base. - 1 cup heavy whipping cream
Heavy whipping cream is essential for achieving a light and airy texture in the cheesecake filling. Whipping it until stiff peaks form incorporates air, making the filling more luscious. - 12 large strawberries, hulled
Strawberries serve as the festive base, resembling Santa's body. Their natural sweetness and vibrant color also bring a fresh contrast to the richness of the cheesecake filling. - Mini chocolate chips for eyes
Mini chocolate chips add a whimsical touch, acting as Santa's eyes. They provide a burst of chocolate richness that complements the overall sweetness of the dessert. - Whipped cream for hats
Whipped cream serves as the fluffy hat for each Santa. Its light, airy texture mimics the decorative element while adding to the festive look.
Directions & Preparation
Step 1: Prepare the strawberries
Begin by washing and hulling the strawberries, removing the green tops to create a flat surface for the cheesecake filling. This step is crucial because it provides stability for the strawberries when they are placed upright, ensuring they do not topple over during assembly.
Step 2: Make the cheesecake filling
In a mixing bowl, combine softened cream cheese, powdered sugar, and vanilla extract. Beat the mixture on medium speed until smooth and creamy. This incorporation process mixes air into the filling, making it light and enhancing the overall texture of the cheesecake.
Step 3: Whip the heavy cream
In a separate bowl, whip the heavy cream until stiff peaks form. This process is essential as it creates the airy texture that will lighten the cheesecake filling. Be careful not to overwhip, as this can lead to a grainy consistency instead of a smooth one.
Step 4: Fold cream into cheesecake mixture
Gently fold the whipped cream into your cheesecake base using a spatula. This step ensures you retain the airiness of the whipped cream, contributing to a light, fluffy filling. It's essential to mix slowly to avoid deflating the cream, which could affect the final texture.
Step 5: Fill the strawberries
Using a piping bag or a small spoon, carefully fill each hulled strawberry with the cheesecake mixture, creating a Santa-like figure. Make sure to leave some space at the top for the whipped cream hat. This step adds a personal touch to each dessert, making them uniquely festive.
Step 6: Top with whipped cream
Pipe a small dollop of whipped cream on top of the filled strawberries. This mimics Santa's hat and adds an extra layer of sweetness. The whipped cream is also what makes these strawberries visually striking, drawing attention to your festive dessert.
Step 7: Decorate with chocolate chips
Place two mini chocolate chips on each filled strawberry to form the eyes of Santa. This step not only enhances the visual appeal but also adds a slight crunch and extra sweetness, creating a delightful contrast with the creamy filling.
Step 8: Chill before serving
Refrigerate the Cheesecake Strawberry Santas for at least 30 minutes before serving. This chilling period allows the cheesecake filling to set slightly, making them easier to handle and enjoy. It also enhances the flavors, making each bite a luscious experience.

Crafting Your Santa's Hats
The whipped cream hats are not only adorable but incredibly easy to style. Using a piping bag with a star-shaped tip allows you to create intricate designs that make your Santas come to life. You can add extra flair by dusting the whipped cream with a hint of powdered sugar for a frosted look, or sprinkle with edible glitter for an extra festive touch. This creativity will impress guests and make the dessert more memorable.
Customization Options for Cheesecake Filling
While the classic cheesecake filling is delightful, you can personalize it further. Consider adding a splash of lemon zest for a citrusy zing or using flavored extracts like almond or peppermint for a different twist. Experimenting with these variations can spark creativity and allow you to develop a unique variation of this festive treat that matches your taste preference.
Creating a Festive Display
Presentation holds the key in making these Cheesecake Strawberry Santas a showstopper at any festive gathering. Arrange them on a decorative platter with additional berries or candy canes around them for a colorful holiday display. You can even incorporate festive garnishes such as mint leaves or sprinkle few edible stars around the Santas for an eye-catching holiday centerpiece.
FAQs
What should I do if my cheesecake filling is too thick?
If your filling feels too thick, you can fold in a little extra whipped cream or milk until it reaches the desired consistency. This will help lighten the texture while maintaining its flavor.
Can I use a sugar substitute in the filling?
Yes, you can use sugar substitutes such as stevia or erythritol. Keep in mind that different substitutes may alter the texture slightly, so it's best to experiment with smaller batches first.
What if my strawberries are not large enough?
If your strawberries are on the smaller side, you can still use them. Just be aware that you may need to adjust the amount of cheesecake filling accordingly for each one.
Can I make these Cheesecake Strawberry Santas without whipped cream?
While whipped cream adds a lightness to the filling, you can substitute with Greek yogurt for a healthier option. However, this may change the richness of the flavor slightly.
What if the chocolate chips don't stick to the strawberries?
If they don't stick, you can lightly dab the chocolate chips into the filling for better adhesion. Ensure the filling is slightly cold as it helps hold the chocolate in place.
Can these Santas be made in advance?
Yes, you can prepare the Cheesecake filling ahead of time and refrigerate it. However, it's best to fill and decorate the strawberries on the day you plan to serve them for the freshest taste.
Conclusion
Crafting Cheesecake Strawberry Santas is a delightful way to celebrate the festive season in the kitchen. Combining creative presentation with delicious flavors makes this treat a must-have for any holiday gathering.
Invite friends and family to help assemble these charming strawberry Santas, making it a fun and interactive experience for everyone. Enjoy the smiles and satisfied expressions as your guests relish these delightful desserts.
Recipe Card
Savory Garlic Herb Roasted Chicken Delight
Ingredients
- 1 whole chicken 3-4 lbs
- 6 cloves garlic minced
- 3 tablespoons olive oil
- 2 tablespoons fresh rosemary chopped
- 2 tablespoons fresh thyme chopped
- 1 lemon zested and juiced
- Salt and pepper to taste
Instructions
- Preheat your oven to 425°F (220°C).
- Prepare the chicken by rinsing and patting it dry with paper towels.
- In a small bowl, mix the olive oil, minced garlic, chopped rosemary, chopped thyme, lemon zest, lemon juice, salt, and pepper.
- Rub the herb mixture all over the chicken, ensuring to get under the skin where possible.
- Place the chicken breast-side up on a roasting pan.
- Roast the chicken for 1 hour to 1 hour and 15 minutes, or until the internal temperature reaches 165°F (74°C).
- Let the chicken rest for 10-15 minutes before carving.
- Carve and serve your Garlic Herb Roasted Chicken.
Notes
Additional serving suggestions: pair with a crisp salad, garlic bread, or roasted seasonal vegetables for balance.
For make-ahead, prep components separately and assemble just before heating to preserve texture.
Taste and adjust with acid (lemon/vinegar) and salt right at the end to wake up flavors.


