
Introduction
Red velvet crinkle cookies are a delightful fusion of rich flavors and inviting appearance, perfect for celebrating special occasions. Their vibrant red hue, complemented by a dusting of powdered sugar, adds a festive touch to any dessert platter.
These cookies offer a unique texture, combining the tenderness of classic cookies with the fudgy chewiness that cookies connoisseurs crave. As you bite into these sweet treats, the deep cocoa notes and subtle cream cheese accents will transport your taste buds to dessert heaven.
Ingredients
- 2 cups all-purpose flour
Flour provides the structure for the cookies, ensuring they hold their shape while baking. It also contributes to the overall texture, creating a chewy mouthfeel. - 1 cup granulated sugar
Sugar not only sweetens the cookies but also aids in achieving that lovely crinkly surface through the method of creaming it with the butter. It also helps with moisture retention. - ½ cup unsweetened cocoa powder
This ingredient gives the cookies their rich chocolate flavor. Using high-quality cocoa powder enhances the overall taste and color of the cookies. - ½ cup unsalted butter (melted)
Butter brings richness and moisture to the cookies, allowing them to remain soft and fudgy while also adding a lovely buttery aroma. - 2 large eggs
Eggs are essential for binding the ingredients together and adding moisture. They also contribute to the overall structure and will help the cookies rise. - 2 teaspoons vanilla extract
Vanilla extract enhances the cookies' flavor, adding depth and richness that complement the cocoa and sugar. - 1 tablespoon red food coloring
This vibrant color is what makes these cookies 'red velvet.' It transforms an ordinary cookie into a visually striking treat suitable for festive occasions. - 1 teaspoon baking powder
Baking powder acts as a leavening agent, providing lift to the cookies and helping them achieve a light and airy texture. - ½ teaspoon salt
Salt balances the sweetness and enhances the flavors in the cookies, ensuring they taste well-rounded. - Powdered sugar for dusting
The powdered sugar coating gives the cookies their signature crinkle effect while also adding a touch of sweetness upon the first bite.
Directions & Preparation
Step 1: Preheat your oven to 350°F (175°C) and line a baking sheet with parchment paper.
Preheating the oven ensures that your cookies begin baking at the right temperature, crucial for achieving the perfect texture. Lining the baking sheet allows for easy removal of the cookies without sticking.
Step 2: In a large bowl, combine the melted butter and granulated sugar until smooth.
Creaming the butter and sugar together is crucial as it incorporates air into the mixture, contributing to the lightness of the cookies. Ensure the mixture is well-combined for a uniform texture.
Step 3: Add in eggs and vanilla extract to the butter mixture, mixing until fully incorporated.
Incorporating eggs at this stage helps to create a more consistent batter. The combination of eggs and vanilla adds moisture and silky richness, both essential for fudgy cookies.
Step 4: In another bowl, whisk together the flour, cocoa powder, baking powder, and salt.
Whisking the dry ingredients separately ensures even distribution and prevents clumps, which is vital for a uniform cookie texture. This step helps to avoid overmixing later.
Step 5: Gradually mix the dry ingredients into the wet mixture, followed by red food coloring.
Combining the dry and wet ingredients gradually prevents overmixing, which can lead to tougher cookies. The addition of food coloring at this time ensures an even distribution of the vibrant hue.
Step 6: Chill the dough in the refrigerator for at least 30 minutes.
Chilling the dough makes it easier to handle and shape, and it helps the cookies maintain their form while baking, resulting in those desirable crinkles. This step also enhances the flavors as they meld together.
Step 7: Use a cookie scoop to portion the dough, rolling each ball in powdered sugar before placing them on the baking sheet.
Rolling the dough in powdered sugar coats it, creating a beautiful crinkle effect during baking. Adequately spaced dough balls allow for proper spreading and cooking.
Step 8: Bake for 10 to 12 minutes or until the edges look firm but the centers remain soft.
Baking until just set prevents overcooking, ensuring that the cookies stay fudgy in the center. The visual cues of soft centers and firm edges indicate they are ready to come out.
Step 9: Allow the cookies to cool on the baking sheet for a few minutes before transferring to a wire rack.
Cooling the cookies slightly on the baking sheet helps them firm up without breaking, making it easier to transfer to a cooling rack where they can fully set.

Mastering the Crinkle Factor
The signature crinkle pattern of these cookies comes from rolling them in powdered sugar before baking. As the cookies spread during baking, the sugar creates cracks on the surface, revealing the rich red color beneath. To achieve a pronounced crinkle, make sure the dough is sufficiently chilled. This allows for better shaping and helps maintain that beautiful texture.
Pairing Flavors: Decorating Your Cookies
While these cookies are delightful on their own, consider embellishing them to suit your festive theme. A drizzle of white chocolate or a sprinkle of sea salt can elevate the flavor profile. For added texture, consider incorporating walnuts or pecans in the dough for a crunchy contrast. Experimenting with toppings can make your red velvet crinkle cookies truly unique.
Serving Suggestions for Your Festive Cookies
Red velvet crinkle cookies are versatile treats that can be served at various occasions, from holiday gatherings to birthday celebrations. Pair them alongside a tall glass of cold milk or a warm cup of cocoa for a comforting treat. These cookies can also serve as delightful gifts when packaged in a decorative box or tin, making them an irresistible surprise for friends and family.
FAQs
What if my cookies don't crinkle properly?
If your cookies don't develop a good crinkle, it might be due to insufficient chilling of the dough. Make sure to chill the dough for at least 30 minutes before rolling and baking.
Can I make these cookies smaller for a bite-sized option?
Yes, you can use a smaller cookie scoop to portion out the dough. Just be sure to adjust the baking time to 8-10 minutes to prevent over-baking.
What can I do if my dough is too sticky?
If your dough feels too sticky to handle, try chilling it for an additional 10 to 15 minutes. You can also lightly dust your hands with flour while shaping the dough.
How can I enhance the chocolate flavor in my cookies?
For a more intense chocolate flavor, consider adding an extra tablespoon of cocoa powder or folding in mini chocolate chips before baking.
What if I want a cream cheese filling for my cookies?
You can make a simple cream cheese filling by mixing cream cheese with powdered sugar, rolling it into small balls, and placing them in the center of your cookie dough before sealing it.
What should I do if my cookies are too dry?
If your cookies turn out dry, it usually means they were overbaked. Keep a close eye on them during the last few minutes of baking and remove them when the edges are firm but the centers look slightly soft.
Conclusion
Red velvet crinkle cookies are not only a treat for the eyes but also for the palate, effortlessly blending festive cheer with indulgent flavor. Whether you’re making them for a holiday gathering, a birthday party, or just to enjoy at home, they are sure to impress.
With their rich cocoa undertones and a hint of cream cheese, each bite is a celebration in itself. So gather your ingredients, embrace the joy of baking, and enjoy these fudgy delights straight from your oven!
Recipe Card
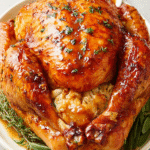
Classic Christmas Roast Turkey with Herb Butter and Gravy
Ingredients
- 1 12-14 lb whole turkey
- 1 cup unsalted butter softened
- 2 tablespoons fresh rosemary chopped
- 2 tablespoons fresh thyme chopped
- 2 tablespoons fresh sage chopped
- 4 cloves garlic minced
- Salt and freshly ground black pepper to taste
- 1 onion quartered
- 1 orange quartered
- 3 cups low-sodium chicken broth
- 3 tablespoons all-purpose flour
Instructions
- Thaw the turkey if frozen.
- Preheat the oven to 325°F (165°C).
- Prepare the herb butter mixture.
- Pat the turkey dry and season inside and out.
- Rub the herb butter under the skin and all over the turkey.
- Stuff the cavity with onion and orange quarters.
- Truss the turkey and place it on a roasting rack.
- Roast the turkey for approximately 3–4 hours.
- Remove the turkey and let it rest.
- Make the gravy using the drippings.
Notes
Additional serving suggestions: pair with a crisp salad, garlic bread, or roasted seasonal vegetables for balance.
For make-ahead, prep components separately and assemble just before heating to preserve texture.
Taste and adjust with acid (lemon/vinegar) and salt right at the end to wake up flavors.


